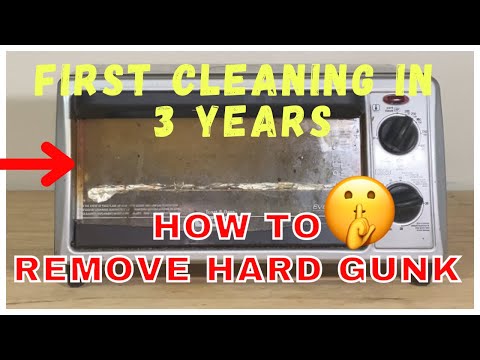
Cleaning the oven is a dreaded task that most people try to avoid for as long as possible. However, when spills and stains start accumulating on the oven ceiling, it’s time to roll up your sleeves and get to work. While it may seem like a daunting task, with the right tips and techniques, you can easily remove stubborn grease and grime from your oven ceiling.
The first step in cleaning your oven ceiling is to remove any removable elements, such as oven racks and trays. This will make it easier to access the ceiling and clean it thoroughly. You can clean these elements separately using an oven cleaner or a simple mixture of dish soap and warm water. Once they are cleaned, set them aside to dry before putting them back in the oven.
To clean the oven ceiling, you can use a commercial oven cleaner or make your own cleaning solution using ingredients you already have at home. One simple and effective homemade cleaner is a mixture of baking soda and water. Simply mix the two ingredients to form a paste and apply it to the dirty areas of the oven ceiling. Let the paste sit for a few minutes to loosen the grease, and then scrub the ceiling with a sponge or a soft brush.
For tough stains and stubborn grease, you may need to use a stronger cleaner. There are many commercial oven cleaners available in the market that can help you tackle even the toughest grime. One popular option is Mr. Muscle Oven and Grill Cleaner, which is known for its powerful cleaning properties. Apply the cleaner to the oven ceiling, following the instructions on the label, and let it sit for the recommended amount of time. Then, scrub the ceiling with a sponge or a brush to remove the grease.
When cleaning the oven ceiling, it’s important to also pay attention to other areas, such as the walls and the oven door. Grease and spills can easily find their way onto these surfaces, so it’s important to give them a thorough wipe down as well. Use the same cleaning solution or oven cleaner that you used for the ceiling, and scrub these areas gently to remove any grease or stains.
After you have finished cleaning the oven ceiling and other areas, make sure to wipe everything down with a clean, damp cloth to remove any residue. This will ensure that your oven is sparkling clean and ready to use. It’s also a good idea to perform routine cleaning and maintenance to keep your oven in tip-top shape and avoid the need for a deep clean in the future.
Remember, cleaning your oven ceiling may take some time and effort, but the end result is well worth it. Not only will a clean oven ceiling improve the overall look of your oven, but it can also help improve its performance and longevity. So, why wait? Grab your cleaning supplies and get started on giving your oven the TLC it deserves!
- Preparing the Oven
- 1. Turn off the Oven
- 2. Remove Oven Racks and Grill
- 3. Read the Oven Manual
- 4. Protect the Heating Element
- 5. Use a Non-Toxic Cleaner
- 6. Apply the Cleaner and Wait
- 7. Wipe Down the Oven Ceiling
- 8. Clean the Grill and Oven Racks
- 9. Remove Excess Cleaner and Dirt
- 10. Check for Missed Spots
- Cleaning the Oven Ceiling
- 1. Assess the condition of your oven ceiling
- 2. Remove the oven racks or shelves
- 3. Clean the oven ceiling with a sponge
- 4. Pay attention to the oven glass and supports
- 5. Rinse and dry
- Removing Stubborn Grease
- How To Clean Your Oven Element
- 1. Turn off the power
- 2. Let the element cool down
- 3. Remove any debris or spills
- 4. Use water and mild cleaners
- 5. Scrub gently
- 6. Wipe down the element
- 7. Check your oven manual
- 8. Seek professional help if needed
- Turn off the Power
Preparing the Oven
Before you can start cleaning the oven ceiling and removing stubborn grease, you need to prepare the oven. Here’s what’s involved:
1. Turn off the Oven
Make sure the oven is turned off and completely cool before starting the cleaning process. This will prevent any accidental burns or injuries.
2. Remove Oven Racks and Grill
Take out the oven racks and grill from the oven cavity. They can be cleaned separately using a sponge and dish soap.
3. Read the Oven Manual
It’s important to read the oven manual to understand the specific cleaning instructions and any precautions you should take. Different oven models may have different cleaning requirements.
4. Protect the Heating Element
If you have an electric oven, make sure to protect the heating element from any cleaning agents or water. This can be done by covering it with aluminum foil or using a heat-resistant oven liner.
5. Use a Non-Toxic Cleaner
For the oven ceiling and interior, use a non-toxic oven cleaner that is safe for your specific oven type. Avoid using harsh chemicals that can damage the oven or leave toxic residues.
6. Apply the Cleaner and Wait
Apply the cleaner to the oven ceiling, following the product instructions. Allow the cleaner to sit and penetrate the grease for the recommended time. This will help loosen the dirt and make it easier to remove.
7. Wipe Down the Oven Ceiling
Using a sponge or scrub brush, begin wiping down the oven ceiling. Start from the top and work your way down. Use circular motions to loosen the dirt and grease. Pay extra attention to stubborn stains or build-up.
8. Clean the Grill and Oven Racks
While waiting for the cleaner to work on the oven ceiling, clean the oven racks and grill. Use a sponge and dish soap to remove any grease or food residue. Rinse them thoroughly and allow them to dry before placing them back in the oven.
9. Remove Excess Cleaner and Dirt
Once you’ve finished cleaning the oven ceiling and grill, use a wet sponge or cloth to remove any excess cleaner and dirt. Make sure to wipe down all surfaces, including the sides and back of the oven cavity.
10. Check for Missed Spots
Inspect the oven interior and ceiling for any missed spots or remaining grease. If necessary, repeat the cleaning process or use a different cleaning technique to thoroughly remove all dirt and grime.
By following these preparation steps, you’ll be well on your way to a clean oven ceiling and a more enjoyable cooking experience. Just remember to be patient and take your time to achieve the best results.
Cleaning the Oven Ceiling
Cleaning the oven ceiling is an important step in keeping your oven clean and free from stubborn grease and carbon bits. Many people may overlook this area, but it can accumulate grease and dirt over time. Here’s how you can effectively clean your oven ceiling:
1. Assess the condition of your oven ceiling
Before you start cleaning, take a look at your oven ceiling and see how dirty it is. If there are only a few spots or spills, you may be able to remove them using a sponge and some water. However, if there is a layer of grease and carbon buildup, you’ll need to use some cleaning elements to get it clean.
2. Remove the oven racks or shelves
Take out the oven racks or shelves so that you have better access to the ceiling. This will make it easier for you to clean and ensure that you don’t accidentally damage them.
3. Clean the oven ceiling with a sponge
Using a sponge, dampen it with water and start wiping down the oven ceiling. If there are stubborn grease stains or carbon bits, you can use a bit of dish soap or a mild oven cleaner to help break them down. Be sure to rinse the sponge regularly and continue wiping until the ceiling is clean.
4. Pay attention to the oven glass and supports
While cleaning the oven ceiling, don’t forget to also clean the oven glass and supports. These areas can also accumulate dirt and grease. Use the same sponge and cleaning solution to wipe them down.
5. Rinse and dry
After cleaning, rinse the sponge and wipe down the oven ceiling, glass, and supports with clean water. This will remove any remaining cleaning solution or residue. Once everything is dry, you can place the oven racks or shelves back into the oven.
Cleaning the oven ceiling may seem like a simple task, but it can make a big difference in how your oven looks and functions. By regularly cleaning and maintaining this area, you can ensure that your oven heats up properly and prevent any unwanted smells or smoke from appearing during cooking.
Removing Stubborn Grease
Stubborn grease stains on your oven ceiling can be a challenge to remove, but with a few simple tips and tricks, you can get your oven looking as good as new. Here’s what you need to do:
- Start by protecting your health and wear high-quality dish gloves to avoid getting any harsh chemicals on your skin.
- Before you begin cleaning, make sure your oven is completely cooled down to avoid any risk of burns.
- Remove the oven racks and set them aside. You’ll clean them later.
- Using a soft cloth or sponge, wipe away any loose dirt or debris from the oven ceiling. This will make the grease removal process easier.
- For tough grease stains, apply an oven cleaner such as Mr. Muscle or any other cleaner that supports removing grease stains. Follow the instructions on the cleaner’s label for best results.
- Leave the cleaner on the grease stains for about 3 to 5 minutes to allow it to penetrate and dissolve the grease.
- Using a non-abrasive sponge or cloth, gently scrub the grease stains until they start to loosen. You may need to apply a bit of pressure, but be careful not to damage the oven’s enamel surface.
- Rinse your sponge or cloth frequently with clean water while cleaning to avoid spreading the grease around.
- Once you have removed as much grease as possible, wipe down the oven ceiling with a clean, damp cloth to remove any remaining residue.
- For self-cleaning ovens, the high heat during the cleaning cycle should take care of any remaining grease or dirt. However, if there are still some stubborn spots left, you can use the same cleaning method mentioned above to clean them manually.
- After you have cleaned the oven ceiling, don’t forget to clean the oven racks and shelves as well. Refer to our article on “Tips for Cleaning Oven Racks and Shelves” for more information.
By keeping up with regular oven cleaning, you can avoid the build-up of stubborn grease stains in the future. However, if you find that your oven ceiling is beyond your own cleaning abilities or you’re not getting the desired result, you may want to consider hiring a professional cleaner to do the job for you.
Cleaning your oven regularly not only improves its appearance but also helps maintain its performance and prolongs its lifespan. So, don’t wait too long until your oven is covered in stubborn grease – take action and get it looking clean and fresh today!
How To Clean Your Oven Element
If you’re wondering how to clean your oven element, you’re in the right place. Cleaning the oven element is an important task that can help keep your oven running efficiently and prevent any potential damage. Here are some tips on how to clean your oven element effectively.
1. Turn off the power
Before you start cleaning your oven element, make sure to turn off the power. This will prevent any accidents or injuries while you’re cleaning.
2. Let the element cool down
Wait for the oven element to cool down completely before you begin cleaning. Cleaning a hot element can lead to burns or injuries, so it’s important to let it cool down first.
3. Remove any debris or spills
Use a cloth or sponge to remove any debris or spills from the oven element. Be gentle and make sure not to damage the element while cleaning.
4. Use water and mild cleaners
For cleaning the oven element, you can use water and mild cleaners. Avoid using harsh chemicals as they can damage the element. A solution of water and mild detergent should be sufficient to clean the element.
5. Scrub gently
When cleaning the oven element, make sure to scrub gently. Harsh scrubbing can damage the element, so it’s important to be gentle and careful.
6. Wipe down the element
After cleaning, use a damp cloth or sponge to wipe down the oven element. This will remove any remaining dirt or residue and leave it clean and shiny.
7. Check your oven manual
If you’re not sure how to clean your oven element or if there are any specific instructions, consult your oven’s manual. This will provide you with the necessary information on how to clean the element without damaging it.
8. Seek professional help if needed
If you’re unsure about cleaning the oven element on your own or if you’re hesitant to do so, it’s always best to seek professional help. Professional oven cleaners can clean your oven element thoroughly and without causing any damage.
Cleaning your oven element is an important task that should be done regularly to keep your oven clean and functional. By following these tips, you can effectively clean your oven element and ensure that it heats up and cleans your oven cavity without any issues.
Turn off the Power
Before starting the cleaning process, it is important to ensure your safety by turning off the power to the oven. This will prevent any accidental injuries while working with the oven cleaner.
Most ovens have a power switch located either on the control panel or at the back of the appliance. If you are unsure about how to turn off the power, refer to the oven’s user manual or contact a professional technician for assistance.
Once the power is turned off, you can proceed with the cleaning process without any worries.
