
Having a beautiful and well-maintained driveway adds curb appeal to your home. However, over time, block paving driveways can accumulate dirt, moss, algae, and stains, making them look old and worn. The good news is that cleaning block paving is a simple task that you can do yourself, without the need for expensive equipment or chemicals.
When it comes to cleaning block paving, there are several methods you can use. One option is to use a pressure washer to blast away the dirt and grime. However, it’s important to be careful with the pressure setting, as using too much pressure can lift the blocks or damage the surface. It’s also necessary to sweep away any loose dirt, moss, or algae before you begin, as pressure washing can push these materials into the gaps between the blocks.
If you’re dealing with stubborn stains or moss growth on your block paving, there are other treatments you can try. For moss, you can use kiln-dried sand to treat the affected areas. Simply brush the sand into the gaps between the blocks, allowing it to penetrate and dislodge the moss. Afterwards, sweep away any loose sand and rinse the area with water. For oil stains, a solution of soapy water and a scrub brush can help to remove the grease. Just make sure to rinse the area thoroughly afterwards.
To prevent future moss or algae growth, you can apply a diluted solution of household bleach and water to the affected areas. This will kill off any remaining spores and prevent new growth. Alternatively, using a weed control fabric or applying a protective sealant can also help to keep your block paving clean and prevent weed growth.
Regular maintenance is key to keeping your block paving clean and in good condition. Sweeping the driveway once a week to remove any debris or spillages will help to prevent dirt and stains from settling into the surface. If you notice any damaged or loose blocks, it’s important to replace them as soon as possible to prevent further damage.
Cleaning block paving doesn’t have to be a difficult or time-consuming task. With a few simple tips and tricks, you can keep your driveway looking clean and well-maintained for years to come.
- Remove any weeds and moss from the block paving
- 1. Manually remove the weeds
- 2. Scrub the surface with a weed remover
- 3. Use a specialist moss and weed remover
- 4. Prevent future weed and moss growth
- Use a pressure washer to clean the surface
- Apply a weed killer to prevent future growth
- Sweep away any debris and dirt
- Use a special cleaning solution for stubborn stains
- Step-by-step guide:
- Seal the block paving to protect it from damage
- Why should you seal your block paving?
- When should you seal your block paving?
- How to seal your block paving?
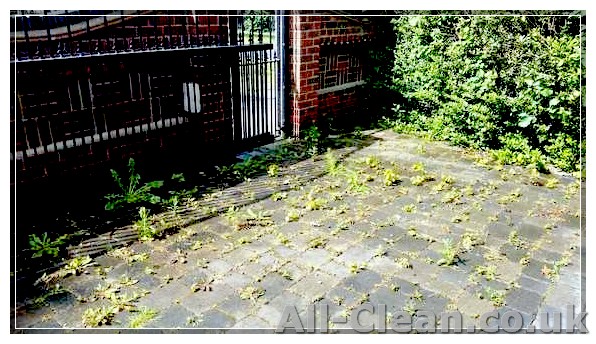
Remove any weeds and moss from the block paving
If you have block paving on your driveway, it’s important to keep it clean and free from weeds and moss. Over time, these plants can grow and spread, making your driveway look untidy and unkempt. Luckily, there are several methods you can use to remove weeds and moss from your block paving.
1. Manually remove the weeds
If you’re willing to put in some effort, manually removing the weeds is an effective way to clean your block paving. Use a small gardening tool or your hands to carefully pull out each weed, making sure to remove the roots. Be patient and thorough, as any left-behind roots can lead to new weed growth in the future.
2. Scrub the surface with a weed remover
If you’re dealing with a larger area or can’t easily pull out the weeds, using a weed remover solution can be a good option. Start by sweeping the driveway to remove any loose dirt and debris. Then, apply the weed remover solution according to the manufacturer’s instructions. Allow the solution to sit for the specified amount of time, and then scrub the surface using a stiff brush or broom. Rinse the driveway thoroughly with water to remove any residue.
3. Use a specialist moss and weed remover
If you have a significant moss or weed problem, or if the above methods haven’t worked for you, consider using a specialist moss and weed remover. These products are designed specifically to target moss and weeds, and often come in a concentrated form that needs to be diluted with water. Follow the instructions on the packaging carefully for the best results.
4. Prevent future weed and moss growth
Once you’ve cleared your block paving of weeds and moss, it’s important to take steps to prevent their return. Regularly sweep the driveway to remove any debris or dirt that could create a suitable environment for weed and moss growth. Consider applying a weed inhibitor or moss prevention treatment to further protect your driveway.
By following these step-by-step instructions and regularly maintaining your block paving, whether it’s with manual weed removal or using specialist cleaners, you can keep your driveway looking clean and beautiful for years to come.
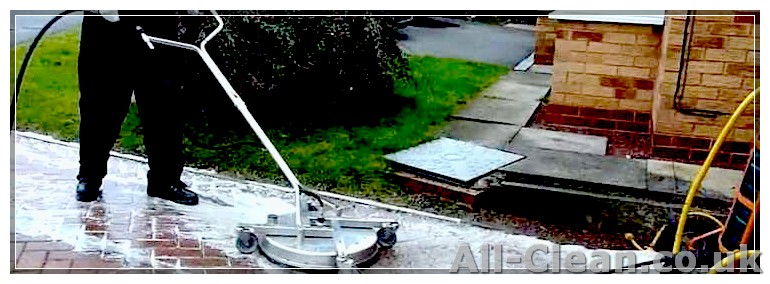
Use a pressure washer to clean the surface
Cleaning your block paving with a pressure washer is a great way to remove dirt, grime, and moss from the surface, leaving it looking brand new. Here’s a step-by-step guide on how to clean your block paving using a pressure washer:
- Start by sweeping the area thoroughly to remove any loose debris or dirt. This will make it easier for the pressure washer to work its magic.
- If there are any large weeds or moss growth between the blocks, use a small brush or your hands to pull them out.
- Before you begin pressure washing, make sure that all furniture, clothing, or other items are removed from the area to prevent them from getting dirty or damaged.
- Connect your pressure washer to a suitable water supply and ensure that it is set at the correct pressure. Be careful not to use too high of a pressure, as this may damage the surface of the blocks.
- If there are any stubborn stains or grease marks on the block paving, you may need to use a jet nozzle attachment to help tackle them.
- Start pressure washing from one end of the driveway and work your way towards the other end. Make sure to cover the whole surface area, paying extra attention to any particularly dirty or stained areas.
- For efflorescence or mineral deposits on new block paving, you may need to use a mild acid solution to treat the problem. However, be sure to follow the manufacturer’s instructions and take proper safety precautions when working with acids.
- Once the block paving has been cleaned, allow it to dry completely before using the area again. This may take a few hours or up to a day, depending on the weather conditions.
- For regular maintenance, you can apply a weed killer or moss killer to prevent any further growth. Be sure to use products that are safe for use on block paving.
- If you’re looking to keep your block paving in top condition, it’s recommended to repeat the pressure washing process every 6-12 months, or as needed.
By following these steps, you can keep your block paving clean and looking great for years to come!
Apply a weed killer to prevent future growth
After you have thoroughly cleaned your block paving, it is important to take steps to prevent weed growth in the future. Weeds can detract from the overall appearance of your driveway and can be difficult to remove once they have taken root. Applying a weed killer can help to prevent future weed growth, keeping your driveway looking beautiful for longer.
Before applying any weed killer, it is important to take care and read and follow the manufacturer’s instructions. Some weed killers may require you to dilute them before use, while others may need to be applied undiluted. Always wear protective clothing, such as gloves and goggles, when applying any cleaning products to your paving.
To apply the weed killer, follow these steps:
- Sweep the block paving to remove any debris or loose dirt.
- Apply the weed killer to any visible weeds, making sure to cover the entire plant.
- If you have a pressure washer, you can use it to rinse away any excess weed killer and dislodge any remaining weeds.
- If you don’t have a pressure washer, use a hose with medium pressure to rinse away the weed killer and dislodge any remaining weeds.
- Allow the weed killer to work for the recommended time, typically around 2-4 hours.
- Rinse the block paving with water to remove any residue from the weed killer.
It’s important to note that weed killers are not a permanent solution and may need to be reapplied periodically to prevent weed growth. Additionally, there may be other issues contributing to weed growth, such as areas where the sand between the pavers has been lost or damaged. In these cases, it may be necessary to reapply sand to the affected areas to prevent weeds from taking root.
By taking the time to apply a weed killer and following these instructions, you can help to keep your block paving looking clean and weed-free.
Sweep away any debris and dirt
Sweeping your block paving regularly is a simple but effective way to keep it looking clean and fresh. This step is especially important if you have trees or plants nearby that shed leaves or other debris. By sweeping away any dirt, leaves, or other debris, you ensure that it doesn’t get trapped between the blocks and cause staining or damage.
When sweeping, use a specialist block paving brush with stiff bristles to effectively lift dirt and debris. Sweep in an angled motion to reach into the gaps between the blocks. Make sure to sweep the entire surface, including any edges or corners. If there are any stubborn stains or moss growth, you can use a wire brush to gently scrub the affected areas.
It’s recommended to sweep your block paving at least once a week to maintain its cleanliness. However, if you notice any significant build-up of dirt or debris, you may need to sweep more often.
Use a special cleaning solution for stubborn stains
If you have stubborn stains on your block paving, such as oil spills or rust marks, a regular cleaner might not be enough to remove them. In these cases, you will need to use a special cleaning solution or remover that is designed specifically for tough stains.
Step-by-step guide:
- Start by thoroughly cleaning the surface of your block paving. Use a brush or broom to remove any loose dirt, debris, or weeds.
- If there are any small weeds growing between the pavers, it’s important to treat them first. Use a weed killer or carefully pull them out by hand.
- Mix the special cleaning solution or remover according to the manufacturer’s instructions. These solutions often contain acids that can clean and remove stains effectively. However, make sure to wear protective clothing and follow all safety precautions.
- Apply the cleaning solution or remover to the stained areas. Use a brush or sponge to gently scrub the stains, making sure to not apply too much pressure that could damage the pavers.
- Allow the cleaning solution to sit on the stains for the recommended amount of time, usually between 4 to 7 minutes.
- Afterwards, rinse the area thoroughly with water to wash away the cleaning solution and any loosened stains. Use a hose or pressure washer for a more effective rinse.
- Inspect the area to determine if any stains are still present. If needed, repeat the treatment process until the stains are completely removed.
- Once the stains are gone, it’s important to prevent future staining and maintain the cleanliness of the block paving. Regularly clean the surface with a suitable cleaner and sweep away any loose dirt or debris.
By using a special cleaning solution or remover for stubborn stains, you can keep your block paving looking clean and beautiful for years to come. Just remember to always follow the manufacturer’s instructions and take proper care of your pavers to extend their life.
Seal the block paving to protect it from damage
The longevity and durability of your block paving driveway or patio depend on how well it is maintained. One key step in the maintenance process is sealing the block paving to protect it from damage caused by weeds, oil stains, and other factors that can make your paved area look dirty and worn.
Why should you seal your block paving?
Sealing your block paving offers several benefits. First, it helps prevent weed growth between the blocks, making it easier to keep your driveway or patio weed-free. Second, it provides a protective layer that repels oil stains, making it easier to clean them up before they can penetrate the surface. Third, it enhances the color of your block paving, giving it a fresh and attractive look.
When should you seal your block paving?
Sealing your block paving should be done after it has been thoroughly cleaned. Before applying the sealant, ensure that all stains, moss, and loose sand have been removed from the surface. It is also important to replace any broken or damaged blocks before sealing. Additionally, if you have recently kiln-dried sand joints, make sure it has settled for a week before applying any sealant.
How to seal your block paving?
Here is a step-by-step guide to sealing your block paving:
- Sweep the entire paved area to remove any loose debris and dirt.
- If there are any stains or oil spills, use a pressure washer or scrub brush with a suitable cleaning solution to remove them.
- Rinse the area with clean water to ensure that all cleaning agents are thoroughly washed off.
- Allow the surface to dry completely before applying the sealant. This may take a day or two, depending on the weather.
- Choose a high-quality block paving sealant that is suitable for the type of paving you have.
- Apply the sealant using a roller or a brush, following the manufacturer’s instructions.
- Make sure to apply an even coat, covering all the blocks and joints.
- Allow the sealant to dry according to the manufacturer’s instructions. This may take a few hours to a day.
- Once the sealant has dried, your block paving is ready to be used and will be protected from stains and weed growth.
It is recommended to seal your block paving regularly, ideally every 3-5 years, to maintain its overall appearance and protect it from damage. However, the frequency may vary depending on factors such as climate, usage, and the type of sealant used.
By following these steps and regularly sealing your block paving, you can ensure that your driveway or patio stays clean, attractive, and in excellent condition for years to come.


