
When it comes to maintaining your brake system, paying attention to your brake calipers is crucial. These components are responsible for pressing the brake pads against the rotors, causing the wheels to stop in a smooth and controlled manner. Over time, brake calipers can become dirty, worn-out, or even rusty, which can affect their performance and efficiency.
In this guide, we will walk you through the step-by-step process of servicing your brake calipers. We will show you how to remove the calipers from your bike or car, clean them thoroughly, replace any worn-out parts, and refit them back on. With our easy-to-follow instructions and stop motion clips, you’ll be able to service your brake calipers without any hassle.
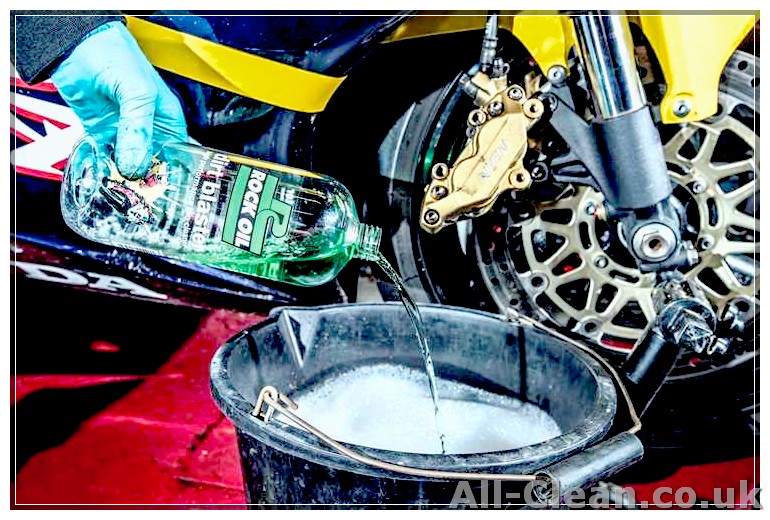
The first step in servicing your brake calipers is removing them from the brake discs or rotors. This is done by loosening the bolts or clips that hold the calipers in place. Once the calipers are free, you can clean them using a bucket of warm water and a mild detergent. Pay attention to any scuzz or dirt build-up, as this can cause the calipers to bind or rust over time. Thoroughly rinse and dry the calipers before moving on to the next step.
Next, it’s time to inspect the brake calipers for any worn-out or damaged parts. This includes the brake pads, pins, clips, and seals. If you notice any signs of wear or damage, it’s important to replace these components to ensure proper braking performance. You can find replacements at your local bike shop or automotive workshop. Once you have the new parts, simply follow our guide to remove the old ones and fit the new ones in their place.
After replacing any necessary parts, it’s time to refit the brake calipers back on. Make sure to align them properly with the brake discs or rotors, and tighten the bolts or clips securely. Be careful not to overtighten, as this can cause damage to the calipers. Use a torque wrench to ensure proper tightening, and double-check all the connections before moving on.
In conclusion, servicing your brake calipers is a crucial part of maintaining your bike or car’s braking system. A thorough cleaning and inspection can help prevent any future issues and ensure optimal brake performance. With our step-by-step guide and stop motion clips, you’ll be able to service your brake calipers with ease, giving you the peace of mind you need when it comes to braking.
- Step-by-step guide to brake caliper servicing
- Step 1: Gather the necessary equipment
- Step 2: Remove the wheels and clean the calipers
- Step 3: Inspect the brake pads and discs
- Step 4: Push back the caliper pistons
- Step 5: Lubricate and reassemble the calipers
- Step 6: Bleed the brake system
- Step 7: Test and adjust the brakes
- Step 8: Clean up and give yourself a pat on the back
- How to Prevent Your Brake Discs From Rusting
- Why do brake discs rust?
- How to prevent rust on brake discs
- Regular maintenance and inspection
- How to protect your brake callipers from rusting
- Step 1: Regularly clean your callipers
- Step 2: Remove the calipers from the wheels
- Step 3: Inspect for wear and replace any damaged parts
- Step 4: Ensure a clean and well-lubricated surface
- Step 5: Protect the callipers with paint or rust prevention spray
- Step 6: Reinstall the callipers
- Step 7: Bleed the brake fluid and replace brake pads if necessary
- Step 8: Test and readjust if needed
- Step 9: Regularly maintain and inspect your brakes
- Restoring Your Wheels: How to Clean Rust From Brake Calipers
- Step 1: Gather the necessary equipment
- Step 2: Remove the wheel
- Step 3: Inspect the brake caliper
- Step 4: Remove loose rust
- Step 5: Clean the rusted areas
- Step 6: Dry the brake caliper
- Step 7: Protect the caliper
- Step 8: Refit the wheel
- Cleaning alloy wheels
- More Motorcycle Maintenance Advice: Cleaning Brake Rotors and Brake Fluid
- Cleaning the Brake Rotors
- Cleaning the Brake Fluid
Step-by-step guide to brake caliper servicing
Brake calipers are a crucial part of your vehicle’s braking system, whether it’s a car or a bike. Regular servicing of your brake calipers is important to ensure proper braking and avoid any potential accidents. In this step-by-step guide, we will walk you through the process of servicing your brake calipers.
Step 1: Gather the necessary equipment
Before starting the servicing process, make sure you have all the necessary tools and equipment. This includes a bucket, brake cleaner, brake fluid, a cleaning brush, paper towels, new brake pads (if needed), a mini lubricant, and a winding tool.
Step 2: Remove the wheels and clean the calipers
Start by removing the wheels to gain access to the brake calipers. Use a brake cleaner to thoroughly clean the calipers, removing any dirt, brake dust, and residue. Pay extra attention to any rust or debris that may have accumulated.
Step 3: Inspect the brake pads and discs
Inspect the brake pads and discs for any signs of wear. If the pads are worn out or the discs are scored, it may be necessary to replace them. If they are still in good condition, proceed to the next step.
Step 4: Push back the caliper pistons
Using a winding tool, carefully push back the caliper pistons. This will create space for the new brake pads and ensure proper braking. Take your time and be gentle to avoid any damage to the calipers.
Step 5: Lubricate and reassemble the calipers
Apply a small amount of lubricant to the caliper pins and sliding surfaces. This will help prevent binding and ensure smoother operation. Reassemble the calipers onto the brake discs and tighten them securely.
Step 6: Bleed the brake system
If you have opened the brake system during the servicing process, it’s important to bleed the brake system. This will remove any air bubbles and ensure optimal brake performance. Follow the manufacturer’s instructions for bleeding the brakes.
Step 7: Test and adjust the brakes
After completing the servicing process, test the brakes to ensure they are working properly. Take your vehicle for a short drive and perform several braking tests to make sure everything is functioning as it should. If you notice any issues, revisit the previous steps to identify and address the problem.
Step 8: Clean up and give yourself a pat on the back
Once you’re done servicing your brake calipers, clean up any mess and dispose of any old brake pads or fluids properly. Take a moment to appreciate the effort you’ve put into maintaining your vehicle’s braking system. Your vehicle will thank you with reliable stopping power on the road!
How to Prevent Your Brake Discs From Rusting
When it comes to maintaining your brakes, it’s not just about ensuring they function well within your vehicle. It’s also important to pay attention to the condition of your brake discs. If your brake discs become rusty, it could affect the braking performance and even cause damage to other brake components.
Why do brake discs rust?
Brake discs are exposed to various elements and can develop rust over time. This can happen if your vehicle is parked for an extended period, especially in a humid or corrosive environment. Rust can also form if the vehicle is not ridden or used regularly – for example, in the case of a motorcycle or bike. Additionally, moisture and dirt can accumulate on the discs during normal braking, making them prone to rusting.
How to prevent rust on brake discs
To prevent your brake discs from rusting, follow these steps:
- Clean the brake discs regularly: After servicing or when you notice dirt or grime on the discs, take the time to clean them. Use a soft cloth or a nylon brush to remove any dirt or brake dust. Make sure not to use any corrosive cleaning agents, as they can damage the discs.
- Protect the discs during servicing: When servicing your brakes, be careful not to expose the discs to excessive moisture or corrosive substances. Use nylon clips or covers to protect the discs while working on the calipers or other brake components.
- Remove rust promptly: If you notice any rust on the discs, it’s crucial to remove it as soon as possible. Use a rust remover or a mixture of vinegar and water to gently scrub the affected areas. Be careful not to damage the discs or the brake pads while removing the rust.
- Dry the discs thoroughly: After cleaning or removing rust, make sure to wipe the discs dry. Moisture can promote rust formation, so it’s important to remove any remaining water or moisture from the surface of the discs.
- Apply a rust-resistant coating: To provide extra protection, you can apply a rust-resistant coating or brake cleaner to the discs. This will help prevent future rusting and extend the life of the discs.
Regular maintenance and inspection
To ensure your brake discs stay rust-free, it’s essential to maintain a regular servicing schedule. This includes inspecting the discs for any signs of damage, scoring, or wear. If you notice any issues with the discs or the braking performance, it’s advisable to consult a professional or refer to the manufacturer’s advice for further guidance.
By following these preventive measures and giving your brake discs the attention they deserve, you can keep them in optimal condition, ensuring reliable and effective braking performance for your vehicle.
How to protect your brake callipers from rusting
Well-maintained brake callipers are crucial for the smooth operation and longevity of your vehicle’s brakes. If your callipers become rusted or corroded, it can cause serious issues with your braking system, compromising your safety on the road. Follow this step-by-step guide to protect your brake callipers from rusting and ensure optimal performance:
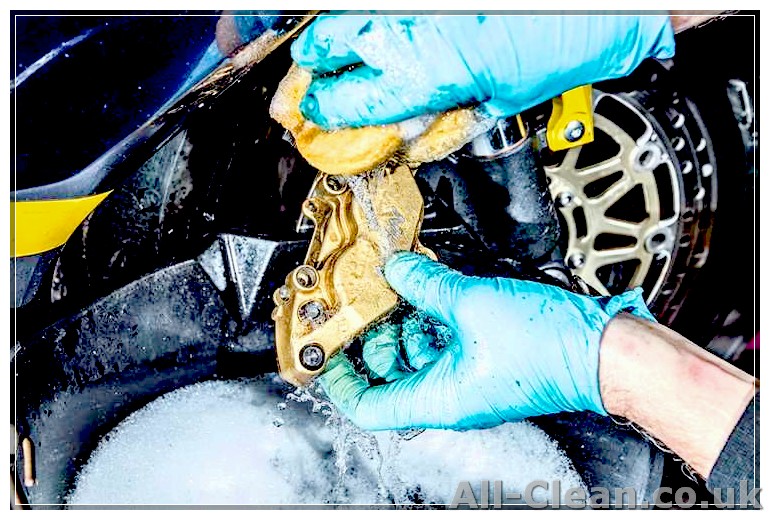
Step 1: Regularly clean your callipers
One of the best ways to prevent rust and corrosion is to keep your brake callipers clean. After each ride, make sure to remove any accumulated dirt, grime, and scuzz from the callipers. Use a suitable cleaning agent and a brush to gently scrub the surface. Pay attention to the nooks and crannies to ensure a thorough cleaning.
Step 2: Remove the calipers from the wheels
To have better access to your callipers, you will need to remove them from the alloy wheels. Unscrew the clips or bolts that hold the callipers in place and carefully take them off the disc. Make sure to wear protective gloves during this process to avoid any potential injuries.
Step 3: Inspect for wear and replace any damaged parts
Once the callipers are removed, inspect them closely for any signs of wear or damage. Look for rust spots, cracks, or any other issues that may impact their performance. If you notice any problems, it’s advisable to purchase suitable replacements from a trusted auto parts store or have them serviced by a professional workshop.
Step 4: Ensure a clean and well-lubricated surface
Before reinstalling the callipers, it’s crucial to clean the mounting surfaces properly. Use a wire brush or sandpaper to remove any dirt, rust, or other debris. This step is necessary because a dirty or uneven surface can lead to calliper binding and affect the overall operation of the brakes.
Step 5: Protect the callipers with paint or rust prevention spray
If you want to provide an extra layer of protection for your callipers, consider applying a suitable high-temperature paint or rust prevention spray. Make sure to follow the manufacturer’s instructions and let the paint or spray dry completely before reinstalling the callipers.
Step 6: Reinstall the callipers
Once the callipers are clean and protected, it’s time to reinstall them. Use a torque wrench to tighten the mounting bolts, ensuring that they are properly secured. It’s essential to follow the manufacturer’s specifications for torque values to avoid any issues.
Step 7: Bleed the brake fluid and replace brake pads if necessary
If you’ve disconnected the brake lines during the calliper removal process, it’s essential to bleed the brake fluid to remove any air bubbles that may have entered the system. Additionally, inspect the brake pads for wear and replace them if necessary. This step will help ensure optimal braking performance.
Step 8: Test and readjust if needed
After all the steps are completed, it’s important to test your brakes before hitting the road. Slowly pump the brake pedal a few times to ensure the callipers are properly engaged, and there are no issues with braking responsiveness. If needed, adjust the callipers or brake pads as per the manufacturer’s instructions.
Step 9: Regularly maintain and inspect your brakes
Lastly, to prolong the lifespan of your brake callipers and prevent rusting or other issues, it’s crucial to maintain and inspect your brakes regularly. Follow the manufacturer’s recommendations for brake service intervals and address any problems promptly.
By following these steps and regularly maintaining your brake callipers, you can protect them from rusting and ensure the optimal performance of your vehicle’s braking system.
Restoring Your Wheels: How to Clean Rust From Brake Calipers
When it comes to brake caliper maintenance, one important task is to clean rust from your brake calipers. Rust not only affects the appearance of your wheels but can also impact the performance of your brakes. Follow this step-by-step guide to learn how to clean rust from your brake calipers:
Step 1: Gather the necessary equipment
- Bucket of soapy water
- Nylon brush
- Paper towels
- Protective gloves
Step 2: Remove the wheel
Before you start cleaning the rust, you need to remove the wheel to access the brake caliper. Use a jack to lift your vehicle and then use a wrench to loosen and remove the bolts holding the wheel in place. Set the wheel aside in a safe location.
Step 3: Inspect the brake caliper
Once the wheel is removed, take a close look at the brake caliper. Inspect it for any signs of pitting or wear. If the caliper is severely worn or damaged, it may need to be replaced.
Step 4: Remove loose rust

Use a nylon brush to remove any loose rust from the surface of the brake caliper. Be careful not to scratch or damage the caliper while doing this.
Step 5: Clean the rusted areas
Dip the nylon brush into the soapy water and scrub the rusted areas of the brake caliper. Apply firm pressure to remove the rust. You may need to repeat this step a few times to completely clean the rust from the caliper.
Step 6: Dry the brake caliper
Use paper towels to dry the brake caliper thoroughly. Make sure there is no moisture or residue left on the caliper as it can lead to further rusting.
Step 7: Protect the caliper
Once the brake caliper is dry, you can choose to protect it by applying a layer of paint or a rust inhibitor. This will help prevent future rust formation and extend the life of the caliper.
Step 8: Refit the wheel
After the brake caliper is clean and protected, it’s time to refit the wheel. Carefully align the wheel with the bolts and tighten them securely. Make sure the wheel is rotating smoothly before lowering your vehicle back to the ground.
By following this guide and cleaning the rust from your brake calipers, you can give them a new life and ensure your brakes perform at their best. Remember to always be careful when working on your vehicle and use proper safety equipment, including gloves and breathing protection.
Cleaning alloy wheels
When it comes to maintaining your vehicle’s brakes, it’s important not to overlook the cleanliness of your alloy wheels. Dirty wheels can cause the brakes to bind, leading to poor braking performance and potential damage to the pads and calipers. Here’s a step-by-step guide on how to clean your alloy wheels properly:
- Gather the necessary tools: Before you start the cleaning process, make sure you have the following tools on hand: a bucket of soapy water, a wheel brush, a soft sponge or cloth, a nylon brush, a wrench, and a drying cloth.
- Prepare your wheels: Start by parking your car on a level surface and engaging the parking brake. If you’re cleaning the front wheels, turn the steering wheel towards the opposite side. For the back wheels, turn it towards the same side. This will provide better access to the different sections of the wheels.
- Removing dirt and rust: Use a wheel brush or a soft sponge to remove any loose dirt or debris from the wheels. Pay close attention to the areas around the brake calipers, where dirt tends to accumulate. If you notice any rusting on the wheels, use a nylon brush to gently scrub away the rust.
- Cleaning the wheel face: Dip the wheel brush or sponge into the bucket of soapy water and clean the front and back sides of the wheel thoroughly. Focus on one section at a time, rotating the wheel as necessary. For hard-to-reach areas, use the nylon brush to get into the crevices.
- Clean the brake calipers: The brake calipers can often become dirty and covered with brake dust and grease. Use a sponge or cloth to clean the calipers, ensuring to reach all the corners and crevices. You can also use a toothbrush or a small brush for a more thorough cleaning.
- Rinsing and drying: After you’ve cleaned all the wheels and calipers, rinse them thoroughly with clean water to remove any soap residue. Once rinsed, use a drying cloth to dry the wheels completely before moving on to the next wheel.
- Inspecting for damage: While cleaning your alloy wheels, take the opportunity to inspect them for any signs of damage. Look for scored or deeply scratched areas, as these may require repairs or replacements.
- Tightening the lug nuts: Once you’ve finished cleaning and inspecting all the wheels, use a wrench to tighten the lug nuts. Make sure to tighten them in a star pattern to ensure even tightening.
- Final touches: To give your alloy wheels a polished look, you can apply a specialized wheel cleaner or polish. Follow the manufacturer’s instructions carefully for the best results.
By following these steps, you can ensure that your alloy wheels stay clean and prevent rusting. Regular maintenance and cleaning of your wheels will not only enhance the appearance of your vehicle but also improve the overall performance of your brakes.
More Motorcycle Maintenance Advice: Cleaning Brake Rotors and Brake Fluid
When it comes to motorcycle maintenance, cleaning your brake rotors and brake fluid is another important step to ensure your bike’s optimal performance. Here’s some advice on how to go about it:
Cleaning the Brake Rotors
The first thing you’ll need to do is remove the wheels. Don’t forget to fill the bike’s front or rear reservoir with a brake cleaner to prevent the brake fluid from going back up into the system.
Once the wheels are removed, use a brake cleaner to spray the rotors on both sides. This will help remove any tough dirt, dust, or corrosive residue that can cause your brakes to wear down more quickly. Make sure to use a non-corrosive cleaner that won’t damage the metal surface of the rotors.
After spraying the cleaner, use a nylon brush to scrub the rotors gently. Be thorough and take your time to ensure all the dirt and residue are removed.
Once the rotors are clean, rinse them with water to remove any remaining cleaner. Then, dry them off completely before reassembling the wheels.
Cleaning the Brake Fluid
The brake fluid in your motorcycle can also collect dirt and other contaminants over time. To clean it, start by removing the brake callipers.
Next, use a brake cleaner to spray the callipers and brake fluid reservoir. This will help remove any dirt or debris that may have accumulated inside. Use a nylon brush to scrub the callipers gently, ensuring all surfaces are clean.
Once the callipers are clean, inspect the brake fluid for any signs of contamination. If it appears dirty or has a milky appearance, you need to flush and replace it. Follow the manufacturer’s instructions for bleeding the brakes and replacing the fluid.
After the callipers and brake fluid have been serviced, reassemble the wheels back onto the bike. Ensure that all bolts and clips are tightened properly.
Remember that regular cleaning of your brake rotors and brake fluid is crucial for maintaining proper braking performance and ensuring your safety on the road. Follow the steps outlined here for a clean, well-functioning brake system.


