

Is the render on your house looking a little grubby? It’s time to give it a good clean! Cleaning the render on your home not only improves its appearance but also helps to protect it from water damage and other external elements. In this article, we’ll teach you how to clean render in a step-by-step guide so that your house can look like new again.
Before you start cleaning, it’s important to note that there are different types of render, including traditional cement-based render and modern low-maintenance renders like Weberend. The cleaning solutions and techniques can vary depending on the type of render you have, so make sure to check the manufacturer’s instructions before you begin.
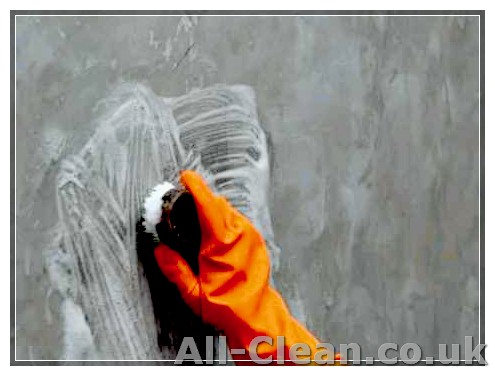
Step 1: Prepare your tools and surfaces. Start by removing any loose vegetation, like moss or algae, from the surface of the render. You can use a soft brush or a pressure washer on a low setting for this step. Be careful not to apply too much pressure, as it can damage the render.
Step 2: Choose the right cleaning product. There are many render cleaning products available on the market, so do some research to find the one that suits your needs. Look for a product that is specifically designed to clean render and kill any algal or moss growth. You can find product recommendations and reviews on our website by clicking on the tags at the bottom of this page.
Step 3: Apply the cleaning solution. Once you’ve chosen your cleaning product, follow the manufacturer’s instructions on how to mix and apply it. In general, you will need to dilute the cleaning solution with water and then spray it onto the render using a sprayer. Make sure to cover the entire surface of the render and allow the solution to sit for the recommended amount of time.
Step 4: Rinse and scrub. After the cleaning solution has had time to work its magic, it’s time to rinse it off. Use a pressure washer or hose to thoroughly rinse the render, starting from the top and working your way down. If there are any stubborn stains or areas that need extra attention, you can scrub them with a soft brush or sponge.
Step 5: Dry and inspect. Once you’ve finished rinsing and scrubbing, give the render some time to dry. Take this opportunity to inspect the walls and look for any signs of damage or areas that may need repair. If you notice any cracks or loose render, it’s important to address them before applying any water-repellent or protective products.
In conclusion, cleaning the render on your house is a simple and effective way to improve its appearance and protect it from water damage. By following these step-by-step instructions, you can make your house look like new again and keep it looking great for years to come. So grab your tools and get started on your render cleaning project today!
- Contact Us
- Comparison Tool
- Weberend Render Cleaner
- Fixing Mortars Comparison Guide
- A Guide to Render Cleaning
- Step 1: Assess the Condition of the Render
- Step 2: Remove Vegetation
- Step 3: Adjust Your Cleaning Solution
- Step 4: Apply the Cleaning Solution
- Step 5: Wash Away the Dirt
- Step 6: Protect and Fix
- Step 7: Watch for Signs of Damage
- Watch out for Vegetation
Contact Us
If you have any questions or need assistance with cleaning and maintaining the render on your house, feel free to contact us. Our team of experts is here to help you.
You can reach us by:
- Phone: 555-123-4567
- Email: [email protected]
- Online contact form: https://www.rendercleaningcompany.com/contact
We offer a wide range of services and solutions to clean and protect your rendered surfaces. Whether you need a one-time cleaning or regular maintenance, we have the right products and tools to get the job done.
Our cleaning solutions are designed to effectively remove dirt, grime, algae, and other contaminants without damaging the render or the environment. We use high-quality products like WeberSil, a water-based and eco-friendly cleaner that is safe to use on all types of renders. WeberSil is a hydrophobic product, meaning it repels water and helps protect the render from algal growth and water damage.
In addition to cleaning, we also offer render repair and maintenance services. If your render has cracks, chips, or other signs of damage, our team can repair and restore it to its original condition. We work with industry-leading adhesives and materials, such as WeberPral, to ensure a long-lasting and durable repair.
At our company, we believe that proper care and maintenance of your rendered surfaces is essential for keeping your home looking clean and attractive. Clean renders not only enhance the appearance of your home but also protect it from water damage and other potential issues.
Render cleaning is not just about making your home look cleaner. It is an important part of external house maintenance and construction. Proper cleaning and maintenance allow your renders to breathe and function properly, rather than trapping moisture and causing damage. Regular cleaning also helps to prevent the buildup of dirt, algae, and other contaminants that can degrade the render over time.
It is important to note that not all renders are the same, and the cleaning methods and products may vary. That’s why it’s important to follow a step-by-step guide or consult with professionals who have the knowledge and expertise to effectively clean and protect your specific render.
When it comes to cleaning render, practice makes perfect. The more you do it, the better you’ll become at adjusting your technique and finding the right solutions for your specific needs. Remember to always test any cleaning or treatment product in a small, inconspicuous area before applying it to the entire surface.
In summary, cleaning and maintaining render on your house is a vital part of keeping it looking clean and protecting it from damage. With the right tools, products, and knowledge, you can easily clean and care for your render, ensuring that it stays in good condition for years to come.
Comparison Tool
When it comes to cleaning render on your house, there are various options available in the market. This comparison tool will help you understand the differences between two popular render cleaning products and make an informed decision for your home:
Weberend Render Cleaner
- Designed specifically for low-maintenance homes with external render
- A comprehensive guide is provided to walk you through the cleaning process step by step
- Note that this cleaner is suitable for use on render with joints up to 3mm wide
- It emphasizes sustainability and provides instructions on how to watch for signs of sustainability over time
- For removing tough stains, it is recommended to use a pressure washer
Fixing Mortars Comparison Guide
- If you notice any signs of damage or cracks, this guide will teach you how to fix them yourself
- Provides tips for protecting and cleaning render from graffiti
- Note that it is important to choose a product that allows the render to breathe
- Solutions like webersil can be used to protect the render and make it water-repellent
- It also offers advice on how to incorporate greenery without causing damage to the render
Both products provide guides and solutions for cleaning and protecting your render. Whether you’re looking for a cleaner or a tool to fix any issues, you can adjust your choice according to your specific needs. However, it is important to contact professionals or refer to the full guide for a more comprehensive understanding of how to clean and maintain your render.
A Guide to Render Cleaning
Render cleaning is an important aspect of maintaining the appearance and longevity of your home or building. Over time, external surfaces like render can become dirty, stained, or covered with moss, algae, or graffiti, making your property look grubby and uncared for. In this article, we will guide you through the process of cleaning render, step by step.
Step 1: Assess the Condition of the Render
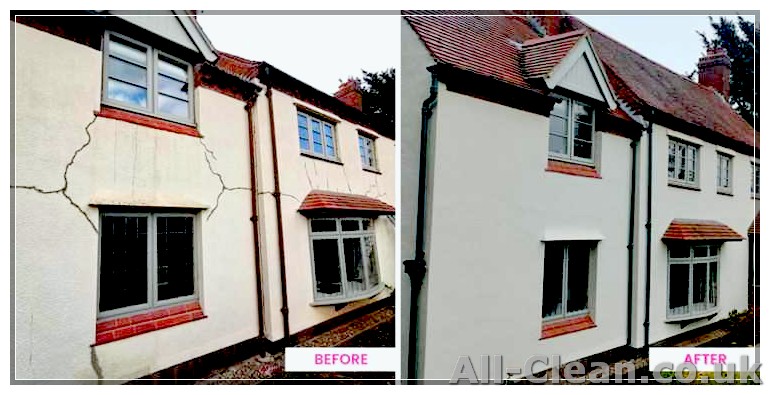
Before you start cleaning your render, it’s important to assess its condition. Look for any cracks, loose or missing render, or areas where the render is damaged. If you notice any issues, make a note of them, as they may require fixing or repair before you proceed with the cleaning.
Step 2: Remove Vegetation
If there is any vegetation growing on your render, such as moss or greenery, it’s important to remove it before you start the cleaning process. You can do this by using a tool like a scraper or brush to gently scrape away the vegetation.
Step 3: Adjust Your Cleaning Solution
Depending on the extent of dirt, stains, or graffiti on your render, you may need to adjust your cleaning solution. There are various render cleaning solutions available on the market, so choose one that is suitable for your specific needs. Read and follow the instructions on the product carefully.
Step 4: Apply the Cleaning Solution
Once you have chosen your cleaning solution, it’s time to apply it to the rendered surface. This can be done using a sprayer or a handheld brush, depending on the size and accessibility of the area you’re cleaning. Follow the instructions provided by the manufacturer.
Step 5: Wash Away the Dirt
After applying the cleaning solution, use a pressure washer or a hose with a high-pressure nozzle to wash away the dirt, stains, and cleaning solution from the render. Be careful not to use too much pressure, as it can damage the render. Adjust the pressure and distance as needed.
Step 6: Protect and Fix
After the cleaning process, it’s important to protect and fix any issues with the render. This can be done by applying a suitable protective coating or sealant, if recommended by the manufacturer. Additionally, any cracks or damage should be repaired to ensure the render remains in good condition.
Step 7: Watch for Signs of Damage
Once the cleaning and protection process is complete, monitor the render for any signs of damage or reoccurring issues. By regularly inspecting and maintaining the render, you can prevent future problems and extend its lifespan.
By following this step-by-step guide, you can ensure your render is clean, protected, and looking its best. Remember, render cleaning is an important part of maintaining the appearance and sustainability of your home or building, so take the time to care for it properly.
Watch out for Vegetation
When cleaning the render on your house, it is important to watch out for vegetation that may be growing on the exterior walls. Vegetation such as moss and algae can cause damage to the render if left untreated. They can penetrate the surface of the render and lead to cracks and discolouration.
To protect your walls from vegetation, it is recommended to use a water-repellent product. This will create a hydrophobic barrier on the surface, making it difficult for moss and algae to grow. The product can be applied using a sprayer or a brush.
Note that when using a pressure washer to clean the render, you should be careful not to damage the surface. High-pressure water can remove the protective layer of the render and cause it to crack or disintegrate. It is best to use a low-pressure setting and keep the nozzle at a safe distance from the wall.
If you notice any signs of vegetation on your rendered walls, it is important to take immediate action. Remove any moss or algae using a soft brush or scraper. Be gentle to avoid causing any damage to the render. You can also use a cleaning solution specifically designed for removing vegetation.
Weberpral M is a popular product for cleaning and protecting rendered walls. It is a water-repellent render that is also hydrophobic, making it resistant to moss and algae growth. Applying Weberpral M to your walls will not only clean them but also protect them from future damage.
For a step-by-step guide on how to clean render on a house using Weberpral M, click here.
In comparison to other cleaning solutions, Weberpral M is a low-maintenance option. It does not require regular cleaning or treating. Once applied, it will keep your render looking fresh and clean for a longer period of time.
When fixing any external render, it is important to take care and protect the surrounding vegetation. Use adhesives and joint fillers that are environmentally friendly and safe for plants. Avoid using any chemicals that may harm the vegetation.
Remember, prevention is always better than repair. By regularly cleaning and protecting your rendered walls, you can avoid the growth of moss and algae. This will not only keep your house looking clean and beautiful but also extend the lifespan of the render.


