
If you are a beer lover or have a kegerator at home, you know how important it is to keep your system clean. Dirty lines and equipment can affect the taste and quality of your drinks. In this article, we will share essential tips on how to clean a kegerator and properly maintain beer lines, ensuring that you always enjoy fresh and delicious beer.
First and foremost, cleaning your kegerator and beer lines should be a regular maintenance task. It is recommended to clean your system at least once every six to eight weeks or more frequently if you are a heavy user. Regular cleaning not only ensures optimal beer flavor but also keeps bacteria, yeast, and other contaminants at bay.
When it comes to cleaning your kegerator and beer lines, there are two main methods you can follow: manual cleaning and automatic cleaning. Manual cleaning involves the use of cleaning solutions, brushes, and scrubbing, while automatic cleaning is a more hands-free approach using a recirculating line cleaning kit.
To clean your kegerator and beer lines manually, start by turning off the CO2 and disconnecting the keg. Remove the faucet, shank, and any other removable parts, and soak them in a cleaning solution. Use a brush to clean the inside of the beer lines. Rinse all parts thoroughly and reassemble the kegerator. Make sure to follow the specific instructions provided with your cleaning solution.
If you prefer an automatic cleaning method, investing in a recirculating line cleaning kit is a great option. This kit typically includes a pump, and it allows you to clean the lines without disassembling the system. Simply attach the line cleaning solution to the keg connector, follow the instructions, and let the pump do the cleaning work. This method is quick, efficient, and more convenient for those who want a hands-free approach to cleaning their kegerator.
Cleaning your kegerator and properly maintaining the beer lines is essential to ensure that you always enjoy the freshest and best-tasting beer. Whether you choose to clean your system manually or opt for the automatic method, be sure to follow the recommended cleaning schedule and use the appropriate cleaning solution. By taking these steps, you can maintain the cleanliness and hygiene of your kegerator, making every pour taste as good as if it came straight from the tap in your favorite brewery!
For more in-depth instructions on how to clean your kegerator and maintain the beer lines, you can download free instructional videos or check out online resources like KegWorks, where you can find a wealth of information about kegerators, cleaning kits, and tips for optimal maintenance. Remember, a clean and well-maintained kegerator is the key to enjoying the perfect pint every time!
- Why Regular Cleaning is Essential for Your Kegerator and Beer Lines
- Proper Cleaning Increases Lifespan of Your Kegerator
- Why Cleaning Is Important
- How to Clean Your Kegerator
- Tips for Proper Maintenance
- Keep Your Beer Lines Sanitary with Regular Maintenance
- 1. Clean Your Beer Lines Every 2-4 Weeks
- 2. Use a Beer Line Cleaning Kit
- 3. Flush the Lines and Faucets
- 4. Rinse the Lines and Faucets
- 5. Clean the Drains
- 6. Keep a Cleaning Log
- Prevent Contamination and Off-Flavors in Your Beer
- Maintain Optimal Beer Quality with Regular Cleaning
- Begin with Proper Cleaning
- Recirculation Cleaning
- Replacing Beer Lines and Faucets
- Regular Maintenance
- Conclusion
- Display ‘Last Cleaned’ Date to Ensure Hygiene and customer Trust
- Here are the steps you can follow to display the ‘Last Cleaned’ date:
- Video:
- How to Pour Draft Beer Like a Pro/ How to Become a Bartender
Why Regular Cleaning is Essential for Your Kegerator and Beer Lines
Keeping your kegerator and beer lines clean is essential for maintaining the quality and taste of your draft beer. Regular cleaning helps prevent the buildup of inorganic contaminants, yeast, and bacteria that can affect the flavor and clarity of your beer.
When beer is dispensed from a kegerator, it passes through beer lines that are connected to the tap. Over time, beer residue, yeast, and bacteria can accumulate inside these lines. If not cleaned regularly, this buildup can lead to off-flavors, foaming, and even contamination.
One of the most common issues that arise from dirty beer lines is foaming. When beer is forced through unclean lines, yeast and bacteria can create nucleation points, causing excessive foaming when the beer hits the glass. This not only wastes beer but also creates a poor customer experience.
Regular cleaning is also important for maintaining proper functionality of your kegerator. Over time, the buildup in the beer lines can clog the system and impact the flow rate of the beer. Cleaning the lines helps ensure optimal performance and dispensing efficiency.
To clean your kegerator and beer lines, follow these steps:
- Disconnect the keg and remove the beer lines from the tap.
- Fill a bucket with a cleaning solution specifically designed for beer systems. Follow the instructions on the package for the correct dilution ratio.
- Place the beer lines in the bucket and let them soak for the recommended amount of time. This will help break down any residue and kill any bacteria present.
- While the lines are soaking, clean the other parts of your kegerator, such as the faucet, tap handle, and keg coupler.
- After the soaking time is complete, use a brush or cleaning tool to scrub the beer lines thoroughly, removing any buildup.
- Rinse the beer lines with clean, warm water to remove any remaining cleaning solution.
- Sanitize the beer lines by flushing them with a sanitizing solution. Follow the instructions on the package for the correct dilution ratio and contact time.
- Reattach the beer lines to the tap and reconnect the keg.
- Run water through the system to flush out any sanitizing solution residue.
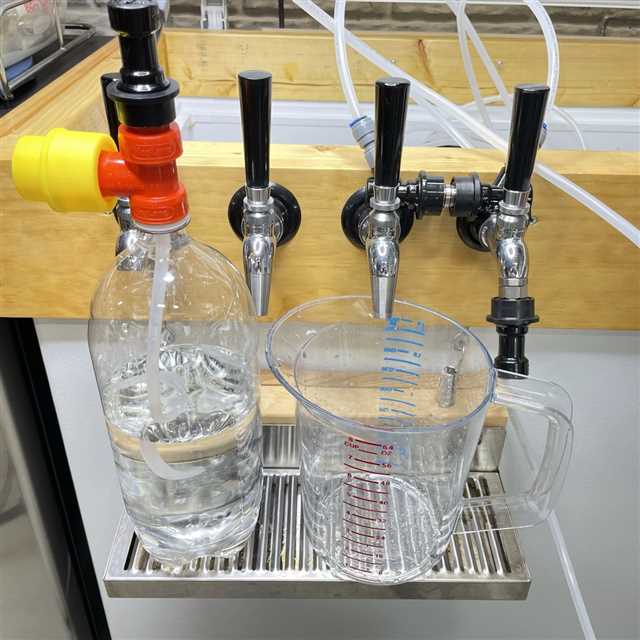
- Once the lines are flushed, it’s time to pour a test beer. This will help ensure that the lines are clean and free from any off-flavors.
By regularly cleaning your kegerator and beer lines, you’ll be able to enjoy the full flavor and clarity of your favorite beers. Not only will your customers appreciate the clean, crisp taste, but you’ll also extend the lifespan of your equipment and avoid costly repairs. Remember, a clean kegerator is a happy kegerator!
Proper Cleaning Increases Lifespan of Your Kegerator
Regular cleaning and maintenance of your kegerator is essential to ensure its longevity and optimal performance. When beer lines and keg couplers are not properly cleaned, it can lead to a buildup of contaminants, such as yeast, bacteria, and other organic matter. This buildup can affect the taste and quality of the beer, as well as cause damage to your kegerator and beer lines.
Why Cleaning Is Important
When beer is dispensed, it leaves behind residue in the lines and couplers. Over time, this residue can become a breeding ground for bacteria and yeast, which can potentially contaminate future beers and cause off-flavors. Additionally, the residue can clog the lines and couplers, leading to poor dispensing and even beer wastage.
Regular cleaning of your kegerator will prevent the buildup of contaminants and ensure that your beer lines and couplers are in optimal condition. By keeping them clean, you can extend the lifespan of your kegerator and enjoy high-quality beer on tap for years to come.
How to Clean Your Kegerator
Cleaning your kegerator involves a few simple steps:
- Disconnect the keg couplers and beer lines from the kegerator.
- Rinse the couplers and beer lines with clean water to remove any remaining beer.
- Prepare a cleaning solution using a keg line cleaner, following the manufacturer’s guide. KegWorks suggests using a mixture of warm water and a cleaning solution, such as Beer Line Cleaner or a brewery-approved sanitizer.
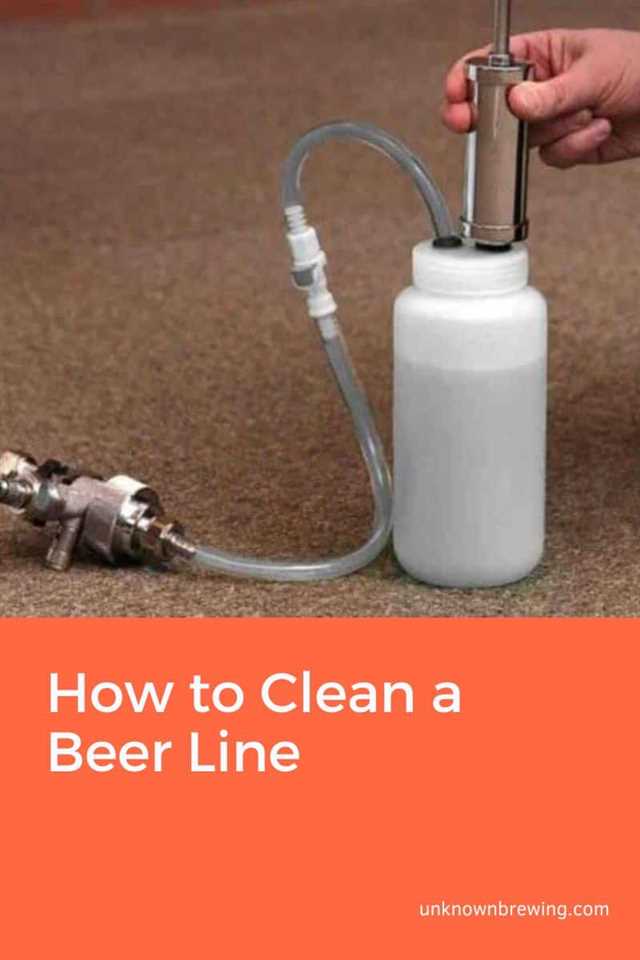
- Attach a hand-pumped or electric-powered cleaning pump to one end of the beer line, and place the other end in a bucket or sink to collect the cleaning solution.
- Pour the cleaning solution into a container and switch on the pump to start recirculating the solution through the beer lines. This will help remove any buildup and contaminants.
- Allow the cleaning solution to run through the lines for the recommended period, usually around 10-15 minutes.
- After the cleaning process, flush the lines with clean water to remove any residue and cleaning solution.
- If necessary, repeat the cleaning process or use a bottle brush to manually clean the lines.
- Once the lines are clean, reassemble your kegerator and reconnect the keg couplers.
It is recommended to clean your kegerator lines every time you replace or switch out kegs. This will ensure that your beer is always pouring cleanly and that your kegerator remains in optimal condition.
Tips for Proper Maintenance
In addition to regular cleaning, there are some maintenance tips that can help extend the lifespan of your kegerator:
- Keep your kegerator at the correct temperature for optimal beer storage and dispensing.
- Ensure that your kegerator is properly insulated to prevent temperature fluctuations and energy waste.
- Regularly check and replace any worn or faulty parts, such as gaskets and seals, to prevent leaks and ensure proper beer flow.
- Keep your kegerator covered when not in use to protect it from dust and other contaminants.
- Follow the manufacturer’s instructions for cleaning and maintenance.
By following these cleaning and maintenance recommendations, you can ensure that your kegerator stays in top condition, providing you with delicious and refreshing beer for years to come.
Keep Your Beer Lines Sanitary with Regular Maintenance
Regular maintenance is essential to keep your kegerator and beer lines clean and sanitary. Without proper cleaning, bacteria, yeasts, and other contaminants can build up in your beer lines, affecting the taste and quality of your beer. Follow these steps to ensure your beer lines stay clean and your draft beer stays fresh.
1. Clean Your Beer Lines Every 2-4 Weeks
Beer lines should be cleaned every 2-4 weeks, depending on how often you use your kegerator. If you’re a heavy user or have a busy bar, you’ll want to clean the lines more often. Cleaning your beer lines regularly will remove any built-up residue and prevent bacteria from growing.
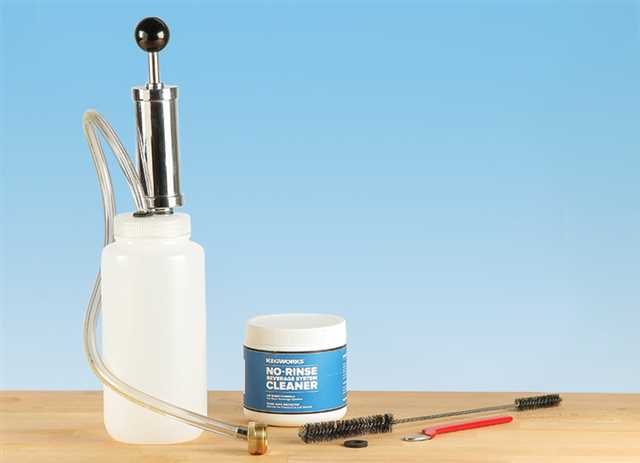
2. Use a Beer Line Cleaning Kit
Invest in a beer line cleaning kit, such as the ones offered by KegWorks. These kits come with all the necessary tools and chemicals to properly clean your beer lines. Follow the included instructions for the best results.
3. Flush the Lines and Faucets
Start by disengaging the keg from the system and flushing the lines with cool water. This will remove any excess beer and make it easier to clean. Next, use a beer line cleaner, such as a caustic cleaner, to thoroughly clean the lines and faucets. Fill a bucket with a mixture of the cleaner and water, and then run it through the lines using a hand-pumped cleaner or a cleaning machine.
4. Rinse the Lines and Faucets
After the lines and faucets have been cleaned, they should be rinsed thoroughly with clean water. This step is important to remove any leftover cleaner and prevent any foaming or off-taste in your beer. Make sure to flush the lines and faucets with enough water to completely remove any residue.
5. Clean the Drains
While cleaning your beer lines, don’t forget about the drains. Beer line cleaner can build up in the drains and cause clogs or foul odors. Use a drain cleaner or vinegar to keep the drains clear and odor-free.
6. Keep a Cleaning Log
Keeping a cleaning log is a great way to ensure that your beer lines are regularly cleaned. Note down the date of each cleaning and any other important details, such as the type of cleaner used. This log will help you track your cleaning schedule and provide relief if any issues arise with your beer lines.
Regular maintenance and cleaning of your beer lines are essential to maintain the freshness and quality of your draft beer. By following these steps and staying on top of your cleaning schedule, you can ensure that every pour is as good as the first.
Prevent Contamination and Off-Flavors in Your Beer
Contamination and off-flavors in your beer can ruin the drinking experience and lead to unhappy customers. Here are some essential tips to help you prevent contamination and off-flavors:
- Clean your kegerator regularly: Keeping your kegerator clean is essential to prevent contamination. Make sure to clean all parts, including the beer lines, taps, and couplers. Follow the manufacturer’s instructions or use an automatic line cleaner for a thorough cleaning.
- Flush and clean beer lines regularly: Over time, beer lines can collect excess yeast, bacteria, and other particles that can affect the clarity and taste of your beer. Use an acid-based line cleaner and a recirculation pump to flush and clean the lines regularly. This will help maintain the quality of your beer and prevent off-flavors.
- Replace couplers when necessary: Couplers, which connect the keg to the beer line, can collect bacteria and other contaminants over time. If you notice any buildup or off-flavors, it’s time to replace the couplers. They are relatively inexpensive and easy to install.
- Keep your kegs clean: Before connecting a new keg, make sure it is clean and free from any residues. Follow the appropriate cleaning process for kegs and always sanitize before use.
- Avoid foaming: Excessive foaming can lead to wastage and affect the taste of your beer. To avoid foaming, ensure proper temperature and pressure settings and handle the beer with care.
- Train your staff: Your staff plays a crucial role in maintaining the cleanliness and quality of your beer. Train them on proper cleaning procedures, handling kegs, and preventing contamination. Regularly remind them about the importance of cleanliness and attention to detail.
- Download cleaning instructions: Many breweries and keg suppliers provide cleaning instructions for their specific systems. Download and follow these instructions to ensure proper cleaning and maintenance.
By following these tips, you can ensure that your beer stays fresh, flavorful, and free from contamination and off-flavors. Cheers!
Maintain Optimal Beer Quality with Regular Cleaning
When it comes to enjoying a fresh, cold beer, cleanliness is key. Regularly cleaning your kegerator and beer lines is essential to maintaining the quality and taste of your beer. In this article, we will outline the necessary steps to keep your kegerator in top shape and your beer flowing smoothly.
Begin with Proper Cleaning
To begin the cleaning process, please ensure that your kegerator is turned off and unplugged. This will prevent any accidents from occurring while cleaning.
Make sure to have the necessary cleaning supplies on hand. This includes a keg-specific cleaning solution or an acid-based cleaner, a brush with a long handle, a bucket for cleaning solution, and rubber gloves to protect your hands.
Start by removing the beer lines and faucet shank from your kegerator. Run warm water through the beer lines to remove any remaining beer and yeast. Then, soak the lines in a cleaning solution according to the manufacturer’s instructions.
Clean the faucet shank and faucet with warm water and a brush. Make sure to remove any built-up residue or mold.
While the beer lines are soaking, clean the inside of your kegerator. Use a mixture of warm water and cleaning solution to scrub away any dirt or bacteria. Pay close attention to the walls, floor, and rubber gaskets.
Recirculation Cleaning
If your kegerator has a recirculation cleaning feature, you can use it to clean the beer lines more thoroughly. This feature allows the cleaning solution to circulate through the lines, removing any build-up or contaminants.
If you are unsure how to use the recirculation cleaning feature, refer to your kegerator’s manual or watch a video tutorial online.
Replacing Beer Lines and Faucets
After cleaning your beer lines, it is important to check for any signs of wear or damage. If you notice any cracks or leaks, replace the lines immediately to prevent contamination.
Similarly, if your faucet or faucet shank is old or damaged, it is recommended to replace them as well. This will ensure a clean pour and eliminate any potential off-flavors.
Regular Maintenance
Regular maintenance is vital to keeping your kegerator in optimal condition. Make it a habit to clean your kegerator at least once every three to four weeks, or more often if you notice any issues or off-flavors in your beer.
Always clean your kegerator before connecting a new keg, even if it is the same beer you previously had. This will eliminate any bacteria or contaminants that may have been left behind.
Additionally, clean your beer lines and faucets between kegs to ensure a fresh and clean pour. This will prevent any flavors from the previous beer from carrying over.
Conclusion
Cleaning your kegerator and beer lines is an essential task to maintain the quality and taste of your beer. Regular cleaning will remove any built-up residue, bacteria, or yeast, ensuring a fresh and clean pour every time. By following these simple steps, you can enjoy your favorite beers with optimal quality and taste.
Display ‘Last Cleaned’ Date to Ensure Hygiene and customer Trust
As a kegerator owner, it is essential to maintain a clean and sanitized system to ensure the quality and taste of your beers. One simple yet effective way to keep track of your cleaning schedule is by displaying the ‘Last Cleaned’ date prominently on your kegerator.
By having this information visible, you can easily determine when it is time to perform routine cleaning and maintenance. This not only ensures proper hygiene but also helps build trust with your customers, as they can see that you prioritize cleanliness.
Here are the steps you can follow to display the ‘Last Cleaned’ date:
- Remove excess beer: Before cleaning your kegerator, make sure to remove any remaining beer from the lines and kegs. You can do this by pumping out or pouring out the beer.
- Download cleaning instructions: Check with the manufacturer or your kegerator’s manual for specific cleaning instructions. You can download these instructions from the manufacturer’s website or contact them directly for assistance.
- Rinse the lines: Connect a cleaning solution to your kegerator and begin pumping it through the lines. Collect the cleaning solution in a container, making sure not to spill it. Repeat this step until the solution appears clean and free from any beer residue.
- Disengage the kegerator: After rinsing the lines, disengage the kegerator from the power source and disconnect any hoses or attachments. This ensures that the cleaning process is done safely.
- Cleaning the beer lines: Using a cleaning brush or beer line cleaning kit, thoroughly clean the lines with warm water and cleaning solution. This step helps remove any build-up, bacteria, or contaminants that may affect the quality of your beer.
- Recirculating the cleaning solution: If your kegerator has a recirculation function, activate it to allow the cleaning solution to circulate through the lines. This helps to clean areas that might be difficult to reach with a brush.
- Flush the lines: After cleaning, flush the lines with water to remove any remaining cleaning solution. This step is crucial to prevent any residual taste or odor from the cleaning solution affecting your beer.
- Use acid-based cleaner for deep cleaning: If you notice stubborn stains or build-up in your beer lines, use an acid-based cleaner. Follow the manufacturer’s instructions carefully, as these cleaners tend to be more potent.
- Repeat the cleaning process every two weeks: For most kegerators, cleaning every two weeks is sufficient. However, this frequency may vary depending on your kegerator’s usage and the quality of your beer. Adjust the cleaning schedule as needed.
- Keep a record of the ‘Last Cleaned’ date: After cleaning your kegerator, update the ‘Last Cleaned’ date prominently on your kegerator. You can use tags, such as small whiteboards or labels, to write down the date. This way, you and your customers can easily see when the kegerator was last cleaned.
By following these steps and maintaining a regular cleaning schedule, you can ensure that your kegerator and beer lines remain clean and sanitary. This contributes to a great tasting beer and eliminates any worries about bacteria or contaminants affecting the quality of your product. Keeping transparent about the ‘Last Cleaned’ date also helps build trust with your customers. Remember, cleanliness is crucial for running a successful kegerator setup!