If you’re a fan of air fryers and use them frequently, you know that with all the cooking comes some cleaning. Over time, residue and grease can build up in your air fryer, causing unpleasant smells and even affecting the taste of your food. That’s why it’s important to regularly clean your air fryer to keep it working properly and to maintain its longevity.
When it comes to cleaning your air fryer, there are a few key areas to focus on. The drip tray and basket are the most obvious places to start, as they often catch any leftover grease and food particles. To clean these areas, simply remove them from the fryer and gently scrub them with a soft-bristled brush and a mixture of warm water and dish soap. For hard-to-remove stains, you can also try a baking soda paste or even a small amount of hydrogen peroxide. Just make sure to rinse thoroughly afterwards to avoid any lingering cleaning solution effects on your food.
In addition to the drip tray and basket, the inside of your air fryer also needs cleaning. After every use, wipe down the interior with a damp, soapy microfiber cloth. For baked-on or greasy stains, you may need to use a degreasing solution or a bit of elbow grease to remove them. Just be careful not to scrub too hard or use any abrasive materials that can damage the non-stick coating.
Lastly, don’t forget to clean the heating element and fan of your air fryer. These areas can collect dust and debris over time, affecting the efficiency of your fryer. To clean them, make sure your fryer is unplugged and cooled down completely. Then, use a soft-bristled brush or a microfiber cloth to gently wipe away any dirt or dust. If your air fryer has a removable heating element, you can remove it and clean it separately. Just make sure to consult your fryer’s manual before attempting to remove any parts yourself.
These easy and effective tips will help you keep your air fryer in good condition and ensure that it lasts for years to come. Remember to clean your air fryer regularly, especially after cooking greasy or baked-on items. By taking the time to clean your fryer, you’ll not only remove leftover smells and stains, but you’ll also maintain the quality and taste of your food. So, don’t forget to give your air fryer some TLC and enjoy the benefits of clean and delicious cooking.
Disclaimer: Before cleaning your air fryer, always read and follow the manufacturer’s instructions. Be sure to unplug your fryer and allow it to cool down completely before cleaning. If you have any doubts or concerns about cleaning or maintaining your air fryer, it’s always best to consult the manufacturer or seek professional advice.
- Steps to Clean an Air Fryer Properly
- 1. Unplug the Air Fryer and Let it Cool Down
- 2. Remove the Removable Parts
- 3. Remove any Debris or Food Particles
- 4. Mix a Cleaning Solution
- 5. Wipe the Exterior of the Air Fryer
- 6. Clean the Interior
- 7. Dry and Reassemble the Air Fryer
- 8. Clean the Drip Tray
- 9. Clean the Exterior Regularly
- Gather the Necessary Cleaning Supplies
- Unplug and Cool Down the Air Fryer
- Remove and Clean the Removable Parts
- Wipe Down the Interior of the Air Fryer
- Clean the Exterior of the Air Fryer
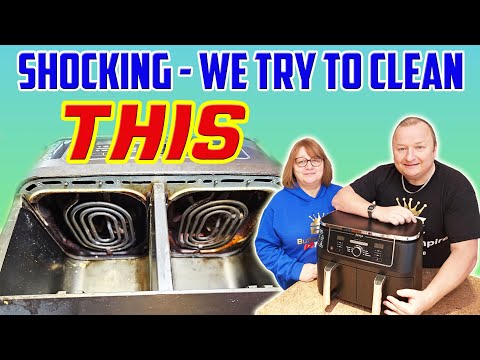
- Video:
- Shocking Ninja Air Fryer – How Easy Is It To Clean?
Steps to Clean an Air Fryer Properly
Cleaning an air fryer is an essential part of maintaining its performance and ensuring its longevity. While it may seem daunting at first, following these steps will make the process easy and effective.
1. Unplug the Air Fryer and Let it Cool Down
Before cleaning your air fryer, always make sure it is unplugged and has cooled down completely to avoid any accidents.
2. Remove the Removable Parts
Most air fryers have removable parts, such as the basket, tray, and pan. Take these parts out and wash them separately, either by hand or in the dishwasher if they are dishwasher-safe.
3. Remove any Debris or Food Particles
After removing the removable parts, check the inside of the air fryer for any debris or food particles. You can use a brush or a damp cloth to gently remove them.
4. Mix a Cleaning Solution
To tackle any grease or stains, create a cleaning solution by mixing warm water and a small amount of dish soap. Alternatively, you can use a mixture of vinegar and baking soda for a natural and effective solution.
5. Wipe the Exterior of the Air Fryer
Dampen a cloth or sponge with the cleaning solution and gently wipe the exterior of the air fryer. Pay attention to any greasy or dirty areas, and scrub gently to remove any stains or residue.
6. Clean the Interior
Use the cleaning solution to wipe down the interior of the air fryer, making sure to clean the heating element and other hard-to-reach areas. Be cautious and avoid using abrasive scrubbing tools as they can damage the non-stick coating.
7. Dry and Reassemble the Air Fryer
After washing all the parts and cleaning the interior, use a dry towel or cloth to dry them thoroughly. Once dry, reassemble the air fryer and make sure all the parts are properly in place.
8. Clean the Drip Tray
Don’t forget to clean the drip tray, which collects any excess grease or oil. Remove it and wash it with warm, soapy water or put it in the dishwasher if it’s dishwasher-safe.
9. Clean the Exterior Regularly
To keep your air fryer looking its best, wipe the exterior regularly with a damp cloth. This will prevent any build-up of stains or residue.
Follow these steps to clean your air fryer properly, and you’ll ensure that it performs well and lasts for a long time. Always refer to the manufacturer’s instructions for specific cleaning guidelines for your air fryer model.
Gather the Necessary Cleaning Supplies
Before you start cleaning your air fryer, it is important to gather all the necessary cleaning supplies. Having them on hand will make the cleaning process easier and more efficient. Here are the essential items you will need:
- Baking Soda: Baking soda is a versatile cleaning agent that can help remove tough stains and odors.
- Dish Soap: A mild dish soap, like Dawn, is perfect for removing greasy residue from the air fryer.
- Microfiber Cloth: A soft microfiber cloth is ideal for wiping down the exterior and interior surfaces of the air fryer.
- Sponge or Soft Brush: Use a sponge or soft brush to scrub away any burnt-on food particles or grease.
- Hydrogen Peroxide: Hydrogen peroxide can help remove stubborn stains and disinfect the air fryer.
- Spray Bottle: A spray bottle filled with water can be used to dampen the surfaces of the air fryer.
- Gloves: Wearing gloves will protect your hands from cleaning agents and hot surfaces.
- Toothpicks or Cotton Swabs: Toothpicks or cotton swabs can help you get into the nooks and crannies of the air fryer.
By gathering these cleaning supplies before you begin, you’ll be well-prepared to tackle any cleaning task that comes your way. Now that you have everything you need, it’s time to move on to the next step in the cleaning process.
Unplug and Cool Down the Air Fryer
Before starting the cleaning process, it is crucial to unplug the air fryer. This ensures your safety and prevents any accidents. Additionally, make sure to let the device cool down completely. Cleaning a hot air fryer can be dangerous and may cause burns.
Once the air fryer has cooled down, you can proceed with the cleaning process. This is particularly important if you have used the air fryer for greasy items like fries or chicken wings, as they can leave greasy residue and smells in the appliance.
Start by removing the tray or basket from the air fryer. This is the part where the food goes, and it often collects a lot of greasy residue and hard-to-remove stains. You can wash it with hot, soapy water or put it in the dishwasher if it is dishwasher-safe. If there are any burnt or sticky spots, you can use a non-abrasive sponge or cloth to scrub them away.
The next step is to clean the inside of the air fryer. This can be done using a damp cloth or sponge. For hard-to-remove stains or greasy areas, you can make a DIY cleaning solution by mixing equal parts of water and vinegar. Apply the solution to the cloth or sponge and wipe the inside of the air fryer.
If there are any stubborn stains or burnt residue, you can use a paste made of baking soda and water. Apply the paste to the stained areas and let it sit for a few minutes. Then, scrub the stains away using a sponge or cloth. Baking soda is a natural cleaner and can effectively remove tough stains.
For the exterior of the air fryer, a damp cloth or sponge usually does the job. If there are any greasy spots, you can use a small amount of dish soap to help remove the grease. Make sure to wipe the surface thoroughly to remove any soap residue. For stainless steel parts, you can use a stainless steel cleaner to keep them shiny.
In some cases, the heating element of the air fryer may need cleaning as well. This can be done by wiping it with a damp cloth or sponge. If there is any debris or food particles stuck to the heating element, you can use a toothbrush to gently scrub them away. However, make sure the air fryer is unplugged and completely cooled down before attempting this.
To keep your air fryer clean and grease-free, it is recommended to clean it after each use. This will not only help in maintaining its performance but also extend its lifespan. If you have been using your air fryer for several months without cleaning, you may notice a drop in its efficiency and cooking results.
Always consult the user manual of your specific air fryer model for cleaning instructions. Some air fryers have specific parts that are dishwasher-safe, while others may not. It is important to follow the manufacturer’s guidelines to avoid damaging the appliance.
Remove and Clean the Removable Parts
- Before starting the cleaning process, ensure that your air fryer is unplugged and has cooled down completely.
- Remove the main basket from the air fryer. This is the part where you place your food for cooking.
- Next, remove the baking pan or tray if your air fryer has one. This is the part that collects the drippings and oil during the cooking process.
- If your air fryer has a removable heating element, carefully remove it as well.
Now that you’ve removed the necessary parts, it’s time to clean them:
- Start by rinsing the removable parts under warm water to remove any food particles or grease.
- In cases where there are stains or burnt food stuck on the parts, create a cleaning solution using warm water and dish soap or a mixture of warm water and baking soda. Soak the parts in this solution for a few minutes to loosen the dirt.
- For tougher grease stains or hard-to-remove food particles, mix equal parts of hydrogen peroxide and baking soda to create a paste. Apply this paste to the stains and let it sit for a few minutes before scrubbing with a soft brush or sponge.
- Once the parts are clean, rinse them thoroughly with warm water to remove any residue.
- Wipe the parts dry with a clean towel or let them air dry completely before reassembling the air fryer.
In some cases, the removable parts of the air fryer may be dishwasher-safe. If this is the case, you can place them in the dishwasher for a more convenient cleaning process.
Remember to always consult your air fryer’s user manual before cleaning to ensure that you are following the manufacturer’s instructions.
Disclaimer: Before cleaning your air fryer, make sure to read the instruction manual that came with your specific model. Some models may have specific cleaning instructions or parts that are not dishwasher-safe, so it’s important to follow the guidelines provided by the manufacturer.
Wipe Down the Interior of the Air Fryer
After each use, it’s important to gently wipe down the interior of your air fryer to keep it clean and maintain its optimal performance. Here’s a step-by-step guide on how to effectively wipe down the interior of your air fryer:
- Start by unplugging the unit and allowing it to cool down. This is crucial for your safety as well as preventing any damage to the fryer.
- If there are any leftover food debris or oil in the basket, remove them by wiping it with a soft-bristled brush or using a soft cloth.
- If there are any stubborn stains or burnt-on food, you can create a paste by mixing dish soap or dawn with a small amount of hydrogen peroxide. Apply the paste to the stains and let it sit for a few minutes before wiping it off.
- To clean the main unit, use a damp cloth or sponge with some soapy water. Make sure not to immerse the unit in water as it can damage the electrical components.
- For hard-to-reach areas, you can use a soft-bristled brush or a toothbrush to scrub away any dirt or grime.
- Wipe down the exterior of the air fryer using a microfiber cloth or a soft cloth dampened with soapy water. This will help remove any fingerprints or grease marks on the surface.
- Don’t forget to clean the drip tray and any removable parts such as the fryer basket and trays. These can usually be washed in the sink with warm, soapy water or placed in the dishwasher if they are dishwasher-safe.
- Once you’ve cleaned all the parts, dry them thoroughly before reassembling the air fryer.
Remember to refer to the specific cleaning instructions provided in your air fryer’s manual, as some models may have different cleaning requirements. It’s also a good idea to occasionally deep clean your air fryer by removing the main unit and giving it a more thorough cleaning to ensure that all parts are completely free of any dirt or residue.
In some cases, if your air fryer is particularly dirty or has a foul odor, you can also use a mixture of lemon juice and water to remove any lingering smells. Simply mix the lemon juice and water in a bowl, dip a cloth or sponge into the mixture, and wipe down the interior and exterior of the air fryer.
These simple tips will help you keep your air fryer clean and in good condition for long-term use. If you have any additional tips or feedback, we’d love to hear from you!
Disclaimer: Before cleaning your air fryer, always ensure that it’s unplugged and completely cool to avoid the risk of electrocution or burns. Refer to your air fryer’s manual for specific cleaning instructions and guidelines.
Clean the Exterior of the Air Fryer
The exterior of your air fryer can also accumulate dirt and grease over time. To keep your air fryer looking clean and well-maintained, follow these easy steps:
- Unplug the air fryer and ensure it has cooled down completely before cleaning.
- Use a soft cloth or towel to wipe away any surface debris or grease.
- If there are any burnt-on stains or hard-to-remove grease, mix a small amount of Dawn dish soap with warm water in a bowl.
- Dip a soft-bristled brush or sponge into the soapy water and gently scrub the exterior of the air fryer.
- For stubborn stains or greasy areas, you can sprinkle some baking soda on the sponge or brush before scrubbing.
- Rinse the sponge or brush with clean water and continue scrubbing until all the dirt and grease are removed.
- Wipe the exterior of the air fryer with a clean, damp cloth to remove any soap residue.
- If there are any remaining stubborn stains or greasy spots, you can use a small amount of vinegar mixed with water to wipe them away.
- Finally, use a dry microfiber cloth to buff and polish the exterior of the air fryer, leaving it looking clean and shiny.
Always remember to consult the manufacturer’s instructions for any specific cleaning guidelines for your particular air fryer model. These tips are general guidelines that should apply to most air fryers, but it’s always best to follow the manufacturer’s recommendations to ensure the longevity of your appliance.