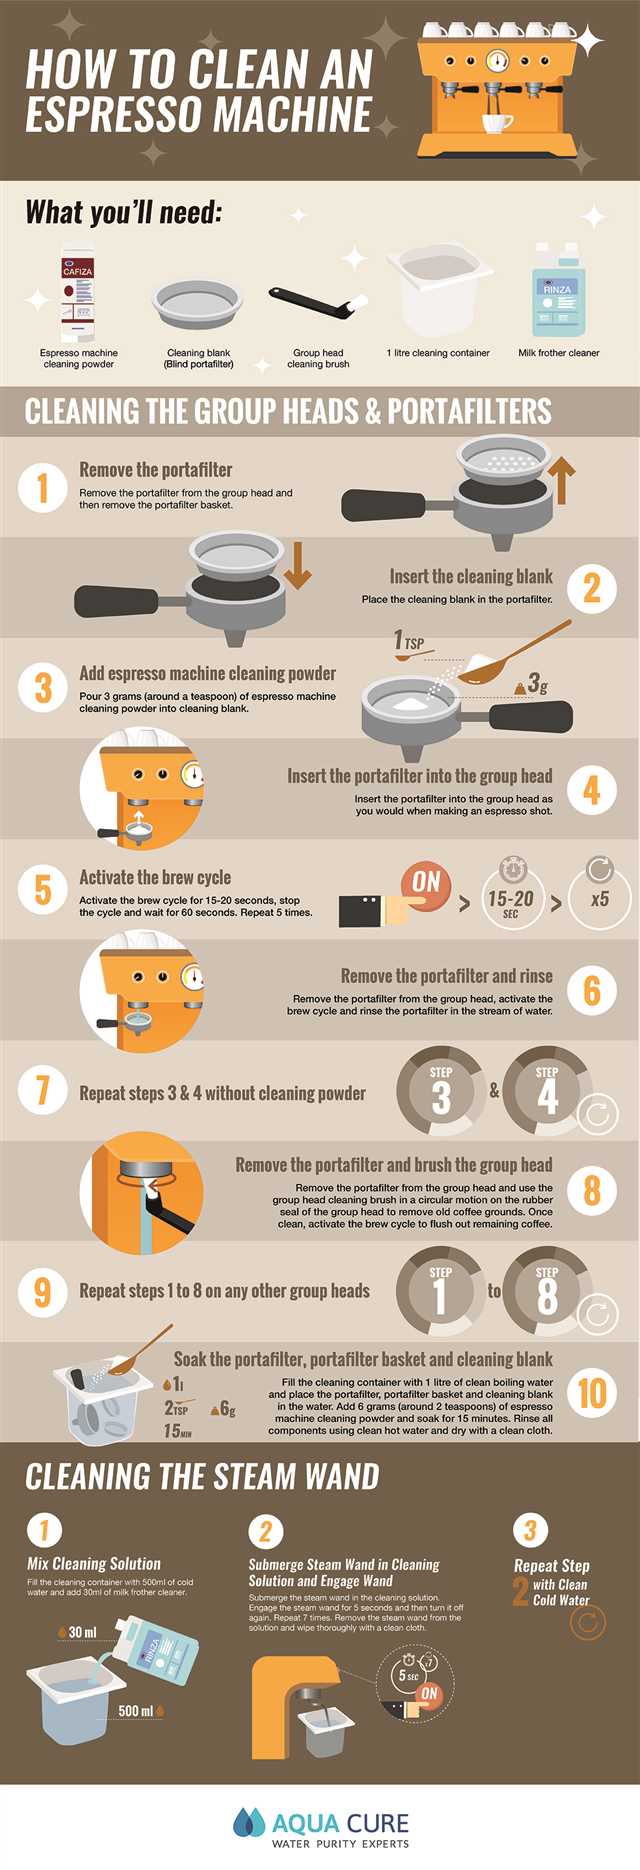

Keeping your coffee machine clean is vital to ensure that it brews the best-tasting coffee possible. With regular use, coffee machines can accumulate residue, oils, and minerals that can affect the flavor and quality of your brew. In order to prevent this buildup and maintain your machine, it is important to perform a thorough cleaning periodically. Here, we will guide you through the simple and careful steps you need to take to cleanse your coffee machine at home.
Step 1: Cleaning the Carafe and Reservoir
The first step is to clean the carafe and reservoir. Start by rinsing out the carafe with hot water and a gentle detergent. Scrub the interior of the carafe with a soft brush to remove any stubborn stains or coffee residue. Then, fill the reservoir with a mixture of hot water and a descaler solution, following the manufacturer’s instructions. Let the solution sit for a few minutes, then rinse thoroughly.
Step 2: Cleaning the Coffee Machine Head
The coffee machine head is where the magic happens. This is where the water and coffee grounds come together to create your delicious brew. To clean the head, start by turning off the machine and removing the coffee grounds. Wipe away any excess coffee residue with a damp cloth. Then, use a small brush to clean the mesh and seats of the coffee head. Be careful not to use any sharp objects that may damage the delicate parts.
Step 3: Cleaning the Frother Wand
If your coffee machine has a frother wand, it is important to give it extra attention during the cleaning process. This is because milk residue can build up and affect the performance of the frother. To clean the wand, simply wipe it with a damp cloth after each use. If the wand has a lot of buildup, you may need to remove it and soak it in a mixture of warm water and a descaler solution. After soaking, rinse thoroughly and reattach it to the machine.
Step 4: Descaling the Machine
Descaling is necessary to remove any mineral deposits that may have built up in the machine over time. This is particularly important if you have hard water. To descale the machine, simply follow the manufacturer’s instructions for using a descaler solution. Run the solution through the machine as if brewing a pot of coffee, then run a few cycles of plain water to rinse out any leftover residue.
By following these easy steps and regularly cleaning your coffee machine, you will not only maintain its performance and longevity, but also ensure that you continue to enjoy the best-tasting coffee in the comfort of your own home. With a clean machine, you can truly appreciate the rich flavors and aromas that a well-designed coffee maker, like an Italian espresso machine or a commercial brewer, can deliver. So, take some time to learn how to clean your particular machine and make it a habit to perform a deep cleaning every few months. Your taste buds will thank you!
- Why You Should Clean Your Coffee Machine Regularly
- Step-by-Step Guide to Cleaning Your Coffee Machine
- Step 1: Gather Your Supplies
- Step 2: Clean the Exterior
- Step 3: Clean the Carafe and Filter
- Step 4: Clean the Coffee Machine
- Step 5: Clean the Frothing Wand
- Step 6: Clean the Internal Components
- Step 7: Maintenance and Prevention
- Step 1: Gather the Necessary Cleaning Supplies
- Step 2: Disassemble and Clean Removable Parts
- Step 3: Clean the Internal Components
- Step 4: Run a Cleaning Cycle
- Step 5: Rinse and Reassemble Your Coffee Machine
- Video:
- HOW TO CLEAN / DESCALE KEURIG K SUPREME WITH VINEGAR Start Auto Cleaning Cycle on Machine
Why You Should Clean Your Coffee Machine Regularly

Cleaning your coffee machine regularly is essential to ensure that it continues to brew a delicious cup of coffee every time. Neglecting the cleaning process can result in a buildup of mineral deposits, oils, and other contaminants that can negatively affect the taste and quality of your coffee. Here are some reasons why regular cleaning is necessary:
- Maintains the Taste and Aroma: Over time, coffee oils and residues can accumulate inside the machine, leading to a bitter or unpleasant taste in your brew. Cleaning your coffee machine removes these buildup and helps maintain the rich and flavorful taste of your coffee.
- Prolongs the Machine’s Lifespan: When coffee residue and mineral deposits are allowed to accumulate inside the machine, it can lead to clogs and other issues that can reduce the machine’s efficiency and lifespan. Regular cleaning helps prevent these problems and keeps your coffee machine running smoothly for longer.
- Ensures Hygiene: Over time, germs and bacteria can multiply on the surfaces of an unclean coffee machine, especially in the damp and warm environment it provides. Cleaning your machine regularly helps eliminate these harmful microorganisms and ensures that your coffee is safe to consume.
- Improves Performance: A clean coffee machine functions more efficiently, ensuring that each brew is consistent and of high quality. By removing any obstructions or buildup, the machine can deliver the right amount of water and create the ideal brewing conditions for a perfect cup of coffee.
- Prevents Malfunctions and Repairs: A neglected coffee machine is more prone to malfunctions and breakdowns. By cleaning it regularly, you can prevent the need for costly repairs or replacement parts. It’s a small investment of time and effort that can save you money in the long run.
By following a regular cleaning routine using the steps outlined in our Coffee Machine Cleaning Guide, you can ensure that your coffee machine performs at its best, brews delicious coffee, and lasts for years to come.
Step-by-Step Guide to Cleaning Your Coffee Machine
Regular cleaning of your coffee machine is vital to ensure that it continues to brew delicious coffee and to prevent any potential problems from arising. Follow these easy steps to keep your coffee machine clean and functioning at its best.
Step 1: Gather Your Supplies
Before you begin cleaning your coffee machine, gather all the necessary supplies. You will need:
- Vinegar or a commercial coffee machine descaler
- A liter of water
- A carafe or container to collect the water
- A cloth or sponge
Step 2: Clean the Exterior

First, wipe down the exterior of the coffee machine with a damp cloth or sponge. Pay attention to any areas that may have coffee stains or residue.
Step 3: Clean the Carafe and Filter
Remove the carafe and filter from the coffee machine. Wash them with warm soapy water and rinse thoroughly. If the filter is discolored or stained, soak it in a mixture of water and vinegar or a solution of water and citric acid to remove the stains.
Step 4: Clean the Coffee Machine
Depending on the type of coffee machine you have, the cleaning process may vary slightly. Refer to the manufacturer’s guide for specific instructions. In general, you should follow these steps:
- Fill the water tank with a solution of equal parts vinegar (or a commercial descaler) and water.
- Turn on the coffee machine and start the brewing cycle. Allow half of the solution to brew, then turn off the machine and let it sit for 15 minutes.
- Turn on the coffee machine again to complete the brewing cycle. Discard the vinegar solution.
- Fill the water tank with clean water and run a complete brewing cycle to rinse out any remaining vinegar residue.
Step 5: Clean the Frothing Wand
If your coffee machine has a frothing wand, it will also need regular cleaning. Remove the wand and soak it in warm soapy water for a few minutes. Scrub the wand with a brush to remove any milk residue. Rinse thoroughly and reattach to the coffee machine.
Step 6: Clean the Internal Components
To ensure a deep clean, you may need to remove and clean the internal components of your coffee machine. Refer to the manufacturer’s guide for specific instructions on how to do this. Pay attention to any seals or seats that may need cleaning or replacing.
Step 7: Maintenance and Prevention
To keep your coffee machine clean for longer periods, there are a few additional steps you can take:
- After each use, remove used coffee grounds and rinse the filter thoroughly.
- Wipe down the exterior of the machine regularly to prevent the build-up of dirt and grime.
- Use a commercial descaler or a mixture of vinegar and water once every 2-3 months to thoroughly clean the internal components.
By knowing how to properly clean and maintain your coffee machine, you can ensure that it brews excellent coffee every time, keeps brewing everything clean and extends the lifespan of the machine.
Step 1: Gather the Necessary Cleaning Supplies
In order to deep clean your coffee machine, you will need to gather the vital cleaning supplies. Here is a list of what you will need:
- A cleaning brush
- Vinegar or a coffee machine cleaning solution
- Bicarbonate of soda (optional)
- A microfiber cloth
It’s very important to wear gloves while cleaning your coffee machine, especially when using vinegar or cleaning solutions. Now that you have the necessary supplies, you can proceed to the next steps knowing that you’re well prepared!
Step 2: Disassemble and Clean Removable Parts
- Start by turning off your coffee machine and unplugging it.
- Remove any removable parts, such as the coffee filter, water reservoir, and drip tray. Refer to your machine’s manual to identify all removable parts.
- Some machines have a detachable brew head. If your machine has one, unscrew it and remove it for cleaning.
- For stainless steel surfaces, use a damp cloth or sponge to wipe away any coffee residue. Be sure to pay attention to corners and crevices where dirt can accumulate.
- If your machine has a steam wand, use a brush to clean any milk build-up. Dip the brush in a mixture of warm water and a small amount of dish detergent, then scrub the wand thoroughly. Rinse and wipe dry afterward.
- Clean all the removable parts under running water using a mild detergent. Make sure to remove any coffee grounds or residue. Pay attention to seals, seats, and other areas where debris can hide.
- If the removable parts are discolored or have stubborn stains, you can soak them in a solution of one part vinegar and two parts water for about 30 minutes. Scrub gently with a brush to remove any remaining stains.
- For the coffee carafe, wash it with warm, soapy water and rinse it thoroughly. You can also use a mixture of vinegar and water to remove any stains or lingering coffee residue.
- After cleaning, make sure all the parts are completely dry before reassembling them back into the machine.
- Follow the manufacturer’s instructions for reassembling the machine and replace all the parts correctly.
- Finally, give the exterior of the machine a wipe down with a damp cloth to remove any dirt or residue that may have accumulated.
Caring for and maintaining your coffee machine is essential to ensure its optimal performance and prolong its lifespan. Cleaning the machine’s removable parts should be done once every few months, depending on how often you use it. Knowing the cleaning process is vital to keep your coffee tasting great and to avoid any potential issues that may arise from a dirty machine.
Remember, descaling your machine regularly is also important to remove mineral build-up and keep the machine running smoothly. Follow the manufacturer’s instructions on how to descale your specific machine.
Step 3: Clean the Internal Components
Properly cleaning the internal components of your coffee machine is essential to ensure that it continues to function optimally and produces great-tasting coffee. Here are the steps to follow:
- Turn off and unplug the coffee maker: Before starting the cleaning process, make sure the coffee maker is turned off and unplugged for safety.
- Remove the frothing and citric components: If your coffee machine has a frothing wand or other additional components, detach them carefully. Clean them separately using warm water and mild soap. Rinse thoroughly and let them air dry.
- Use citric acid or white vinegar: Citric acid or white vinegar can effectively clean the internal parts of your coffee machine. Mix 2 parts water with 1 part vinegar or citric acid.
- Run the cleaning solution through the machine: Fill the water reservoir with the vinegar or citric acid solution. Run the coffee maker through a brewing cycle without adding any coffee. This process helps remove any mineral buildup and descale the machine.
- Clean the filter and coffee grounds: Empty the filter and dispose of the used coffee grounds. Rinse the filter thoroughly under running water to remove any remaining residue.
- Wipe down the exterior: While the cleaning solution is running through the machine, wipe down the exterior with a damp cloth. Pay attention to buttons and hard-to-reach areas to ensure a thorough cleaning.
- Repeat the process if necessary: Depending on how often you clean your coffee machine, you may need to repeat the cleaning process several times to remove all mineral deposits and buildup. This step is vital to maintaining the performance and prolonging the lifespan of your coffee maker.
- Rinse with fresh water: After the cleaning cycle is complete, rinse the machine by running a cycle with clean water. This step ensures that any remaining vinegar or citric acid is removed.
Using vinegar or citric acid is a great alternative to commercial coffee machine cleaning solutions. It is less expensive and readily available in most homes. However, if you prefer not to use vinegar or citric acid, you can also use a solution of baking soda and water. Just make sure to follow the cleaning instructions found in your coffee machine’s manual.
Step 4: Run a Cleaning Cycle
Once you have completed the previous steps of cleaning and descaling your coffee machine, it is time to run a cleaning cycle. This step is essential to ensure that your machine is thoroughly cleaned and ready to brew fresh coffee. Here’s how to do it:
- Determine the cleaning method recommended by the manufacturer: Different coffee machine brands and models may have specific cleaning instructions. Refer to your manufacturer’s manual or website to find out the best cleaning method for your machine.
- Prepare the cleaning solution: Based on the manufacturer’s recommendations or if you prefer a homemade solution, you can use citric acid, which works great for removing mineral residue. Mix the solution according to the instructions provided.
- Fill the water reservoir: Fill the water reservoir with the cleaning solution. Make sure not to overfill it and follow the recommended water-to-solution ratio.
- Start the cleaning cycle: Turn on your coffee machine and start the cleaning cycle. The machine will pump the solution through the internal components, cleaning the brewing chamber, pipes, and other parts.
- Pay attention to the coffee machine’s display: Some coffee machines have a cleaning cycle indicator or timer that will let you know when the cleaning cycle is complete. Follow the instructions or wait for the indicator to signal that the cleaning is finished.
- Rinse the machine: Once the cleaning cycle is complete, empty the water reservoir and rinse it thoroughly. Run a couple of cycles with clean water to remove any remaining cleaning solution from the machine.
Routine cleaning and descaling are vital for maintaining your coffee machine’s performance and longevity. By regularly cleaning your machine, you can lessen the wear and tear caused by mineral buildup, ensuring that it continues to work efficiently. Remember to follow the manufacturer’s recommendations and adjust the cleaning frequency based on your usage and water quality.
Next, we will cover how to clean the different parts of your coffee machine in more detail, so you can keep your machine in top shape for a long time.
Step 5: Rinse and Reassemble Your Coffee Machine
After everything has been cleaned and the detergent has been rinsed off, it’s time to reassemble your coffee machine. Follow the steps below to ensure a proper and thorough reassembly:
- Turn off your coffee machine and unplug it from the power source.
- Carefully dry all the parts that you have cleaned with a clean towel. Make sure to pay special attention to buttons, knobs, and other areas where water may have collected.
- If there are any removable parts like the filter or brewer, make sure they are completely dry before putting them back in place.
- Put the parts back in their original positions and secure them tightly. Consult the user manual if you’re unsure about the correct placement.
- If your coffee machine has a frother, ensure that it is assembled correctly. Some machines have a separate filter for the frothing function, so make sure it is in place before use.
- If you have a commercial coffee machine, there may be additional steps or parts that need to be reassembled. Consult the user manual or seek professional guidance if necessary.
- Once everything is back in place, turn on your coffee machine and run a cycle without any coffee or water. This will help ensure that any detergent residue or lingering flavors are washed away.
- After the cycle is complete, discard the water and run one or two additional cycles with clean water to rinse out any remaining traces of detergent or impurities.
- Now your coffee machine is ready to use again! Remember to regularly clean and maintain your machine to ensure its longevity and to keep your coffee tasting fresh.
Knowing how to properly clean and reassemble your coffee machine is essential for its proper functioning and to maintain the quality of your brewed coffee. It is also a vital step to ensure that your machine lasts long and stays in good condition.