
In this guide, we will show you step by step how to change a Henry Hoover bag and clean the filter. Henry Hoovers are popular and reliable vacuum cleaners that can easily handle household dust and debris. However, over time, the bag can get full or the filter can get dirty, causing a loss of suction power and a smelly odor. That’s why it’s important to know how to change the bag and clean the filter to keep your Henry Hoover working at its best.
Step 1: Access the bag and filter. When you want to change the bag or clean the filter, the first step is to take off the lid of the Henry Hoover. You can do this by lifting the head off the machine and removing the cloth bag. Below the cloth bag, you will see the filter that needs to be cleaned or replaced.
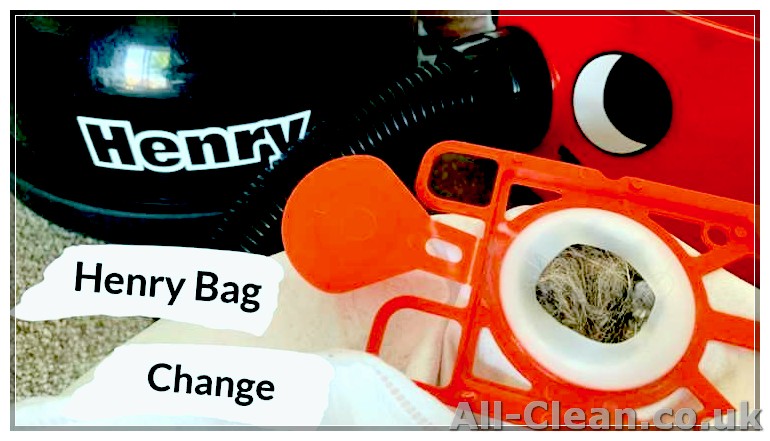
Step 2: Change the bag. To change the bag, simply lift the lid of the Henry Hoover and remove the bag. Be careful not to generate dust in the process. Once the bag is removed, you can dispose of it and replace it with a new one. Make sure the new bag is a perfect fit for your Henry Hoover model.
Step 3: Clean the filter. Before you clean the filter, it’s important to know whether your filter is washable or needs to be replaced. Some Henry Hoovers have washable filters that can be cleaned with water, while others have disposable filters that need to be replaced. If your filter is washable, simply remove it and wash it under running water until it’s clean. If it needs to be replaced, buy a new filter and attach it according to the instructions.
Step 4: Clean the inside and outside of the Henry Hoover. While you have the lid off, it’s a good idea to clean the inside and outside of the Henry Hoover. Use a brush or cloth to remove any dust or debris from the motor and other sides of the vacuum. This will help prevent any smells or smelly odors from developing.
Step 5: Attach the lid and freshener. Once the inside and outside of the Henry Hoover are clean, you can attach the lid and put a freshener inside the bag. Fresheners are a great way to keep your Henry Hoover smelling fresh and clean. They come in different scents, so you can choose the one you like the most.
In summary, changing a Henry Hoover bag and cleaning the filter is a simple process that can be done at home without any special tools. By following these easy steps, you can keep your Henry Hoover running smoothly and eliminate any smells or smelly odors that may have been generated from a full or dirty bag. Remember, it’s always better to replace the bag and clean the filter regularly to maintain the performance of your Henry Hoover and prolong its lifespan. If you have any more questions about Henry Hoover maintenance, don’t hesitate to consult the user guide or contact customer support.
- How to Change a Henry Hoover Bag
- Step-by-Step Guide to Replacing the Bag
- How to Clean a Henry Filter
- Simple Methods to Keep Your Filter Clean
- 1. Regularly Remove and Clean the Filter
- 2. Avoid Strong Smells
- 3. Replace the Filter
- 4. Avoiding Clogs
- Smelly Henry Filter: Causes and Solutions
- 1. Dirty Filter
- 2. Lack of Cleaning
- 3. Washable Filters
- 4. Dirty Bag
- 5. Tapping the Filter
- 6. Access the Filter Lid
- 7. Check and Clean the Filter
- 8. Clean the Sides and Pipes
- 9. Improve the Airflow
- 10. Buy a Replacement Filter
- Identifying the Odor and How to Get Rid of It
How to Change a Henry Hoover Bag
Changing a Henry Hoover bag is a simple process that will help keep your vacuum cleaner clean and smelly-free. By following these steps, you can easily replace the bag in your Henry Hoover and clean the filter:
- Power off the Henry Hoover: Before you begin, make sure that the vacuum cleaner is turned off and unplugged from the power source.
- Open the lid: Locate the lid on top of the Henry Hoover and lift it up to expose the bag compartment.
- Remove the old bag: Carefully take out the old bag from the inside of the compartment and dispose of it. If the bag smells bad or has a foul odor, it is a good idea to replace it even if it is not full.
- Fit the new bag: Take a new Henry Hoover bag and make sure it is the correct replacement for your model. Insert the bag into the compartment, making sure it fits properly and securely.
- Close the lid: Once the new bag is in place, close the lid securely to ensure that no dirt or debris escapes during vacuuming.
By following these steps, you can easily change the bag in your Henry Hoover and ensure that it continues to operate at its best. Remember to frequently check and replace the bag to keep your Henry Hoover running smoothly and efficiently.
Step-by-Step Guide to Replacing the Bag
When your Henry Hoover bag is full of dirt and dust, it’s time to replace it to ensure the power and efficiency of your vacuum. Follow the steps below to easily change the bag and keep your vacuum clean:
- Lift the lid of your Henry Hoover to access the dust compartment. You may need to ask for assistance if you’re having trouble lifting the lid.
- Once the lid is lifted, you will see the bag inside. Take hold of the bag and carefully lift it out of the machine.
- Before you put the new bag in, it’s a good idea to clean the inside of the vacuum to remove any loose dirt or dust. Use a brush or a cloth to wipe the inside of the compartment.
- If the filter is dirty, take it out and clean it as well. You can use a brush to remove any dust or dirt collected on the filter. Cleaning the filter will improve the overall performance of your Henry Hoover.
- When the inside of the vacuum is clean, take the new bag and make sure it is the correct replacement for your Henry Hoover model. You can buy replacement bags at most stores that sell vacuum cleaner accessories.
- Attach the new bag to the bag holder inside the vacuum. Make sure it is securely attached and won’t come off during use.
- If your Henry Hoover has a filter cover, put it back in place before closing the lid.
- Close the lid of your Henry Hoover and make sure it is properly sealed. You can tap the lid lightly to ensure a secure fit.
- Turn on your Henry Hoover to make sure everything is working correctly. If there are any unusual smells or sounds, double-check that you have followed all the steps correctly.
- If your Hoover still smells bad after changing the bag, you can try placing a fabric freshener or dryer sheet in the bag/tub. This will help keep the air fresh as you vacuum.
That’s it! You have successfully changed the bag in your Henry Hoover and cleaned the filter. Your vacuum is now ready to use and will continue to pick up dirt and dust effectively.
How to Clean a Henry Filter
When it comes to cleaning your Henry Hoover, one of the most important tasks is to clean the filter. A dirty filter can affect the performance of your vacuum and can also lead to unpleasant smells. Here are some steps to help you clean your Henry filter:
- First, make sure that your Henry Hoover is turned off and unplugged. Safety always comes first!
- Lift the lid of your Henry Hoover to access the filter. You may need to use some tools to remove the lid, depending on the model you have.
- Take out the filter. Depending on your model, the filter may be inside a tub or attached directly to the motor. Carefully remove it, making sure not to lose any small parts.
- If your filter is washable, take it outside and use water to rinse off the dust and dirt. You can also use a brush to gently scrub away any stubborn debris.
- If your filter is not washable or if you prefer not to wash it, you can use a cloth to wipe off the dust. Just make sure that the cloth is dry and clean. You may also consider using a replacement filter.
- If your filter is smelly, you can add a few drops of fresheners to keep it smelling fresh. Just make sure to let it dry completely before putting it back in your Henry Hoover.
- Once you have cleaned your filter, it’s time to put it back. Make sure it is properly attached to the motor or placed back inside the tub.
- Close the lid of your Henry Hoover and secure it in place. Make sure it is tight enough to prevent any suction loss.
Congratulations! You have successfully cleaned your Henry filter. It’s a good idea to clean your filter regularly to keep your Hoover performing at its best and to avoid any unpleasant smells. If you notice that the suction power of your Henry is not as strong as before or if you still have a bad smell even after cleaning the filter, you may need to replace it.
Simple Methods to Keep Your Filter Clean
Keeping your filter clean is an essential part of maintaining the performance of your Henry hoover. A clean filter not only improves suction power but also prevents dust and debris from being released back into the air, which can cause allergies and respiratory issues. In this guide, we will provide you with some simple steps to keep your filter clean.
1. Regularly Remove and Clean the Filter
- Every few weeks, take off the lid of your Henry hoover. You will see a round filter sitting on top of the motor head.
- Gently lift the filter out and shake off any loose dust or debris.
- If the filter is very dirty, you can use a brush to remove the dust.
- If there is a strong smell or the filter is visibly dirty, it’s time to wash it.
- Use a cloth or brush to wipe away any dust or debris on the filter.
- Wash the filter under tap water. Make sure to wash it thoroughly until the water runs clear.
- Let the filter dry completely before putting it back in your Henry hoover.
- Once dry, attach the filter back onto the motor head and replace the lid.
2. Avoid Strong Smells
- To prevent your filter from developing a strong smell, you should avoid vacuuming up smelly things like pet litter or food waste. Instead, pick up these items by hand or use a dustpan and brush.
- If your filter does become smelly, you can sprinkle a small amount of baking soda onto it before vacuuming. Baking soda helps absorb odors.
3. Replace the Filter
- Filters should be replaced every 4 to 6 months, depending on usage.
- If your filter is torn or damaged, it’s time to replace it.
- Remove the old filter by lifting it out of the motor head.
- Attach a new filter by placing it on the motor head and securing it with the lid.
4. Avoiding Clogs
- To prevent your filter from clogging, make sure to pick up large debris or objects that may obstruct the hose or pipes.
- If your Henry hoover does get clogged, first turn it off and unplug it from the power.
- Take off the hose and check for any obstructions. Clear them out with a brush or cloth.
- Make sure to check the pipes and other parts of the hoover for clogs as well.
- After removing any clogs, replace the hose and pipes securely.
- Turn on the power and test the suction to ensure it’s working properly.
By following the steps above, you can ensure that your Henry hoover will continue to clean efficiently and keep your home fresh and dust-free. Remember to clean your filter regularly and replace it when necessary to maintain optimal performance.
Smelly Henry Filter: Causes and Solutions
If you’ve noticed that your Henry vacuum has a smelly filter, there could be a few different causes. A dirty or clogged filter can generate a foul odor and reduce the machine’s power. Here’s a guide to help you understand the causes and provide possible solutions.
1. Dirty Filter
The most common cause of a smelly Henry filter is a dirty filter. Over time, the filter can become clogged with dirt and debris, causing it to emit an unpleasant smell. To prevent this, you should clean or replace your filter regularly.
2. Lack of Cleaning
If you don’t clean your Henry vacuum frequently enough, the filter can accumulate more dirt and become smelly. Make sure to clean your Henry after each use to avoid this problem.
3. Washable Filters
If you have a washable filter, you should clean it using the manufacturer’s recommended method. Usually, you can wash the filter under running water and let it dry completely before reassembling it. This will help keep your filter fresh and free from odor-causing particles.
4. Dirty Bag
If your Henry vacuum bag is full or dirty, it can generate a smelly odor. Always replace the bag when it’s full, and make sure to keep an extra one on hand so you can swap it out quickly.
5. Tapping the Filter
If your Henry vacuum has a washable filter, you can tap it gently to remove loose dirt and debris. This method can help improve the filter’s performance and reduce odor. Just make sure to do this over a bin or sink to catch any debris that falls out.
6. Access the Filter Lid
To access the filter, you need to turn off the Henry vacuum and take off the lid. Refer to the user guide for detailed instructions on how to remove the lid and access the filter.
7. Check and Clean the Filter
Once you have access to the filter, check it for dirt and debris. If necessary, use a brush or another tool to gently remove any dirt from the filter. You can also wash the filter with water if it’s washable. Make sure the filter is completely dry before putting it back in the vacuum.
8. Clean the Sides and Pipes
While you have the filter out, take the opportunity to clean the inside of the vacuum and the sides and pipes. Use a brush or a damp cloth to remove any dirt or dust that may have accumulated.
9. Improve the Airflow
To improve the airflow and minimize odor, you can tap the sides of the vacuum or use a brush to remove any dirt that may be blocking the pipes. This will help the Henry vacuum work more efficiently and prevent odor-causing particles from being released into the air.
10. Buy a Replacement Filter
If your filter is old or damaged and cleaning doesn’t improve the smell, you may need to replace it. Check the user guide or contact the manufacturer to find out which filter is compatible with your Henry vacuum.
By following these steps, you can keep your Henry Hoover’s filter fresh and free from smelly odors. Regularly cleaning or replacing the filter will ensure that your vacuum continues to perform at its best and leaves your home smelling clean and fresh.
Identifying the Odor and How to Get Rid of It
- Remove the bag and check for any visible dust or debris inside the hoover. If there is any, proceed to step 2.
- Take a cloth and dampen it with water. Gently wipe the inside of the hoover to remove any dirt or dust that may be causing the smell.
- If the odor persists, it may be coming from the filters. Remove the filters from the hoover and clean them thoroughly. If they are beyond cleaning, consider replacing them with new ones.
- If you’ve followed the previous steps and the smell still lingers, it’s possible that there may be a clog in the hose or other parts of the hoover. Use tools like a brush or a vacuum to remove any obstructions that may be causing the odor.
- Once you’ve cleaned or replaced the necessary parts, reattach everything back to the hoover. Make sure all components are securely in place.
- Now that you’ve addressed the odor issue, it’s important to prevent it from coming back. Here’s what you can do to keep your hoover smelling fresh:
- Frequently clean and replace the bags as soon as they are full. A full bag can emit unpleasant odors.
- Regularly clean the filters to prevent the buildup of dust and dirt.
- Avoid hoovering wet or damp areas, as the moisture can cause a musty smell to develop in the hoover.
- Consider using air fresheners or odor-neutralizing sprays outside of the hoover to keep the surrounding area smelling pleasant.
In summary, identifying and eliminating odors in your hoover can be done in a few simple steps. Start by removing any visible dust or debris, then clean the inside of the hoover with a damp cloth. If the smell persists, clean or replace the filters and check for any clogs. Finally, take preventive measures to keep the hoover smelling fresh by regularly cleaning and replacing bags, and avoiding hoovering wet areas.


