
If you’re a fan of scented wax melts, then you know the struggle of dealing with a messy wax warmer. No matter how careful you are, spills and drippage are bound to happen. But there’s no need to worry, as there are easy and mess-free ways to keep your wax warmer clean and in good condition.
One of the top reasons for messes in wax warmers is using too much wax at once. When the wax melts, it can easily spill over the edges of the burner and create a mess. To avoid this, try pouring less wax into the silicone or ceramic dish of your warmer. Just make sure to use enough to release a good scent without overwhelming the space.
If you have spilled or spilt wax that has hardened and is not so easily removed, there’s a pro-tip you can try. First, let the wax completely cool down. Once it’s cold, try placing a few ice cubes in a plastic bag and rub it over the hardened wax. The cold temperature will harden the wax even further, making it easier to remove. Simply wipe away the wax with a paper towel or a cloth, and your wax warmer will be as good as new.
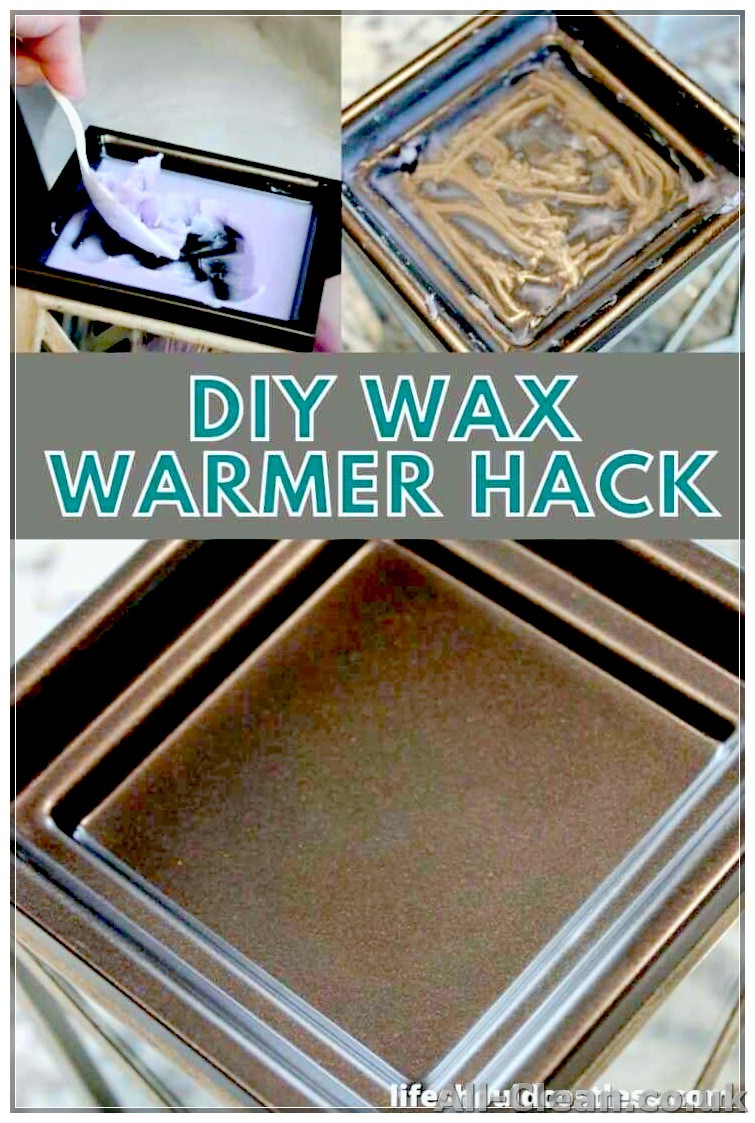
Another mess-free way to clean your wax warmer is to use heat-resistant liners or silicone liners. These liners can be placed in the dish of the wax warmer before adding the wax. Once the wax melts, you can remove the liner along with the wax, making the cleaning process quick and easy.
And what about removing the wax from the jars? Recycling the wax is a great way to reduce waste and save money. To do this, simply wait until the wax has fully melted and then pour it into a separate container. You can then use the melted wax to refill your warmer or make new scented wax melts.
In conclusion, cleaning your wax warmer doesn’t have to be a messy and time-consuming task. By following these easy and mess-free methods, you can keep your wax warmer clean and in pristine condition, all while enjoying your favorite scents.
Credit: Lumore.
Got any more tips or tricks on cleaning wax warmers? Share them in the comments below!
- Traditional Wax Melt Removal
- Method 1: Using Silicone Liners
- Method 2: Using the Freezer
- Method 3: Using the “Popper” Method
- Use a Wax Warmer Liner or Wax Popper
- Try a New Silicone Dish Top
- Recycling Pro
- 1. Wait for the wax to cool down
- 2. Remove the hardened wax
- 3. Clean the dish
- 4. Clean the burner or tealight holder
- 5. Wipe down the outside of the warmer
- 6. Check for any damage
- 7. Follow the instructions
- The Ice Queen
- What You’ll Need
- How to Clean Your Wax Warmer
- The Fire Starter
- 1. Silicone Liners
- 2. Cold Water Method
- 3. Ice Method
Traditional Wax Melt Removal
If you enjoy using wax melts in your warmer, you may be wondering how to clean the wax out of the dish after you’re done using them. Luckily, there are several easy and mess-free ways to remove the wax from your wax warmer.
Method 1: Using Silicone Liners
One popular method is to use silicone liners in your wax warmer. These liners are specifically designed to fit into the dish of your wax warmer, making cleanup a breeze.
- When your wax has fully hardened, simply remove the liner from the dish.
- Peel the hardened wax away from the silicone liner.
- If there is any remaining wax on the edges of the dish, use a silicone spatula or your fingers to remove it.
- Clean the dish with warm, soapy water to remove any residue.
Method 2: Using the Freezer
If you don’t have silicone liners, you can try using the freezer method to remove the wax. This method works best for wax warmers that have a dish that can be removed.
- Place the wax warmer dish in the freezer for at least 30 minutes or until the wax has hardened.
- Once the wax is hardened, use a butter knife or your fingers to loosen and remove the wax from the dish.
- Wipe the dish clean with a damp cloth or wash it with warm, soapy water to remove any residue.
Method 3: Using the “Popper” Method
Another effective method for removing wax from your wax warmer is the “popper” method. This method works well for wax warmers that do not have a removable dish.
- Wait for the wax to fully harden and cool down.
- Place the wax warmer in the refrigerator for a few minutes to make the wax a little more firm.
- Use a small, pointed object like a toothpick or a pin to gently pop the hardened wax out of the dish.
- Wipe the dish clean with a damp cloth or wash it with warm, soapy water to remove any residue.
By following these easy and mess-free methods, you can quickly and effectively remove wax from your wax warmer without wasting any of the scented goodness inside!
Use a Wax Warmer Liner or Wax Popper
If you’re looking for an easy and mess-free way to clean your wax warmer, using a liner or popper can be a great solution. These specially designed liners and poppers are made to catch any melted wax or drippage, making clean-up a breeze.
Wax Warmer Liners:
Wax warmer liners are thin, heat-resistant bags that fit into the wax warmer tray. When the wax melts, it will collect in the liner instead of spilling onto the warmer itself. To clean, simply wait for the wax to cool and harden, then remove the liner and throw it away or recycle it.
One popular brand of wax warmer liners is Lumore, which offers liners in various sizes to fit different wax warmers. These liners are made from high-quality silicone that is durable and easy to clean.
Wax Poppers:
Wax poppers are another option for easy wax removal. These small, round silicone discs fit into the warming dish of your wax warmer. When the wax is melted and cooled, simply pop out the disc and throw it away. Some wax poppers even come with a built-in wick that you can use to easily remove the hardened wax.
Using a liner or popper not only saves you time and effort in cleaning, but it also helps to prolong the life of your wax warmer. With a liner or popper in place, the surface of your warmer remains clean and free from any wax drippage, making it easier to insert new wax melts and ensuring that each scent is as strong and fresh as the last.
So, whether you’re a wax warmer novice or a seasoned pro, using a liner or popper is a simple and effective way to keep your wax warmer clean and mess-free. Give it a try and see how much easier and more enjoyable your wax melting experience can be!
Try a New Silicone Dish Top
If you have a wax warmer, chances are you’ve had to deal with the messy task of cleaning out melted wax. Whether you use traditional wax cubes or vegan wax melts, removing the leftover wax from your warmer can be a hassle. But there’s a simple solution – try using a new silicone dish top!
Silicone dish tops are a great alternative to traditional wax warmers because they are easy to use and clean. They come in different sizes and shapes, so you can find ones that fit your specific wax warmer. Simply remove the old dish from your warmer and replace it with a silicone one. The silicone material is heat-resistant and will withstand the melting wax without getting damaged.
To use a silicone dish top, all you need to do is pour your wax melts into the dish and turn on your warmer. As the wax melts, the heat will evenly distribute throughout the silicone dish, allowing the fragrance to fill the room. Once you’re done enjoying the scent, you can easily remove the dish and pour the melted wax away.
Cleaning a silicone dish top is a breeze. Once the wax has cooled down and solidified, you can simply peel it off the silicone surface. The wax should come off easily without the need for any forceful scraping or scrubbing. If there’s any residue left, you can wipe it away with a damp cloth or sponge.
Another advantage of using a silicone dish top is that it helps prevent spilt wax and drippage. The raised edges of the dish will contain any melted wax, minimizing the mess and making the cleaning process much easier. This is especially helpful if you have kids or pets around who might accidentally knock over the warmer.
One popular brand of silicone dish tops is Lumore. They offer a range of sizes and designs to fit different wax warmers. Lumore also provides additional accessories such as vegan wax melt liners, which can be used to line the silicone dish without the need for any cleaning. These liners can simply be thrown away after use, making the cleaning process even more hassle-free.
If you’re looking for a mess-free and easy way to clean your wax warmer, try using a new silicone dish top. It will save you time and effort, and you’ll love how easily it removes the leftover wax. Not to mention, it can also add a touch of style to your wax warmer with its various designs and colors. Give it a try and see how it makes your wax melting experience even more enjoyable!
Recycling Pro
If you love using wax melts in your home, you know how important it is to keep your wax warmer clean and free from any drippage or waste. Cleaning your wax warmer doesn’t have to be a messy or time-consuming task. With a few easy steps, you can ensure that your wax warmer stays in great condition and ready for your next melt.
1. Wait for the wax to cool down

Before attempting to clean your wax warmer, it’s crucial to wait for the melted wax to cool down and harden. This will prevent any potential damage to the warmer dish or burner. It’s best to wait at least 2 hours after turning off the warmer before attempting to clean it.
2. Remove the hardened wax
Once the wax has cooled down, gently remove the hardened wax from the warmer dish. You can easily do this by using a silicone spatula or a dull knife. Be careful not to scratch or damage the dish while doing this.
3. Clean the dish
After removing the wax, wash the dish with warm soapy water. You can use a mild dish soap or a vegan-friendly cleaner. Make sure to remove any residue or spilt wax from the dish, and rinse it thoroughly.
4. Clean the burner or tealight holder
If your wax warmer has a burner or a tealight holder, clean them as well. Make sure to remove any leftover wax or wick debris. You can use cotton balls or a soft cloth to clean these parts. If there is stubborn wax residue, you can place the burner or tealight holder in the freezer for a few minutes. The cold temperature will help the wax harden, making it easier to remove.
5. Wipe down the outside of the warmer
After cleaning the dish and burner, wipe down the outside of the wax warmer with a damp cloth. This will remove any dust or dirt that may have accumulated.
6. Check for any damage
While cleaning your wax warmer, take the opportunity to inspect it for any damage. Check for any cracks or loose parts that may need repair or replacement.
7. Follow the instructions
Always follow the manufacturer’s instructions for cleaning and maintaining your wax warmer. Different brands may have specific guidelines that you need to follow for optimal performance and safety.
In conclusion, keeping your wax warmer clean and well-maintained is essential to prolong its lifespan and ensure a safe and efficient melt of your favorite scented wax melts. By following these simple steps, you can easily clean your wax warmer without any hassle or mess.
The Ice Queen
If you’re tired of the mess and hassle that comes with cleaning your wax warmer, then you need to try “The Ice Queen” method. It’s a quick and easy way to clean your wax warmer without any fuss.
What You’ll Need
- A wax warmer
- Ice cubes
- Cotton pads or cotton balls
- A microwave-safe bowl or containers
- Water
How to Clean Your Wax Warmer
- Turn off and unplug your wax warmer and allow it to cool down for a few minutes.
- Take out any wax that may still be melted in the warmer using a cotton pad or cotton ball.
- Fill a microwave-safe bowl or container with ice cubes and water.
- Place the bowl or container in the microwave and heat it for 2-5 minutes, or until the ice melts and the water becomes cold.
- Take the bowl or container out of the microwave and place it on a heat-resistant surface.
- Grab a handful of cotton pads or cotton balls and dip them into the cold water.
- Wipe the surface of the wax warmer, paying extra attention to any areas where wax may have spilled or hardened.
- Repeat this process until the wax is completely cleaned off.
- If there are any stubborn wax remnants stuck to the warmer, use a cotton pad or cotton ball soaked in cold water to gently scrape them off.
- Once the warmer is clean, dry it thoroughly with a clean cloth or let it air dry.
- Your wax warmer is now ready to be used again.
The Ice Queen method is a vegan and mess-free way to clean your wax warmer. It’s a great alternative to traditional cleaning methods that may involve the use of fire or harsh chemicals. Plus, it’s quick and easy, with minimal cleanup needed afterwards.
So why not give “The Ice Queen” a try and say goodbye to the mess and hassle of cleaning your wax warmer?
The Fire Starter
When it comes to using wax warmers, there are multiple ways to make the cleaning process easier and mess-free. One of the best solutions is using silicone liners.
1. Silicone Liners
- Place a silicone liner on the surface of your wax warmer to easily clean up any drippage.
- Once your scented wax melts are hardened or you’ve used them up, simply remove the silicone liner and throw away the waste.
- When you’re ready to clean your wax warmer, remove any remaining melted wax by using a forceps or simply wiping it away.
- Be careful when removing the silicone liner as it might still be warm, so make sure to let it cool down and use a cotton wick or a pair of tongs to handle it.
2. Cold Water Method
If you don’t have any silicone liners or if you prefer not to use them, there are other easy ways to clean your wax warmer.
- Wait for the remaining melted wax to fully harden.
- Fill a sink or a bowl with cold water.
- Place the hardened wax warmer in the cold water, ensuring that it is completely submerged.
- Let it sit for a few minutes or until the wax starts to loosen.
- Using a cotton wick or a spoon, gently pry off the hardened wax from the surface of the wax warmer.
- Wipe away any residual wax with a damp cloth or paper towel.
3. Ice Method
If you’re looking for a quick and efficient way to remove hardened wax from your wax warmer, the ice method could be the answer.
- Place a few ice cubes in a plastic bag or a small freezer-safe container.
- Put the bag or container of ice directly on top of the hardened wax in your wax warmer.
- Wait for a few moments until the cold temperature from the ice causes the wax to harden even more or become brittle.
- Once the wax is hardened or brittle, simply lift it off with a cotton wick or a spoon.
- Wipe down the surface of the wax warmer with a damp cloth or paper towel to remove any remaining wax residue.
These methods can help you keep your wax warmer clean without much hassle or mess. Whether you choose to use silicone liners or opt for the cold water or ice method, you can enjoy your favorite scents without worrying about the cleaning process.
Do you have any other tips for cleaning wax warmers? Let us know in the comments!


