
In this article, we will teach you all about render cleaning, including tips, techniques, and products to help you keep your walls looking brand new. Whether you’re a DIY enthusiast or a construction professional, this guide is for you. We will start by explaining what render is and why it needs regular cleaning. Then, we will go into detail about the various methods and products you can use to clean your render effectively.
If you have noticed stains, moss, or mould on your rendered walls, it’s time to take action and give them a proper wash. Cleaning rendered walls not only improves their appearance but also helps protect and prolong their lifespan. With a little education and some handy tips and tricks, you can easily remove stains and keep your render looking fresh and clean for months to come.
One of the best ways to clean rendered walls is by using a pressure washer. However, it’s essential to use the right techniques and products to avoid any damage to the render or surrounding greenery and vegetation. We will provide a step-by-step guide on how to wash your render using a pressure washer, including the exact settings and precautions you should take.
When it comes to the products you should use for render cleaning, there are various options available on the market. From low-maintenance cleaners to biocides and moss removal solutions, we will discuss the pros and cons of each product, providing you with a full comparison to help you make an informed decision. Additionally, we will talk about the importance of using a render cleaner that is compatible with the type of render you have, whether it’s Weberpral, Weberend, or other types of render.
If you’re looking for extra protection for your render, we will also guide you on how to apply a render repair and protect system. These systems help repair small cracks and defects in the render while providing a protective barrier against graffiti, mould, and other pollutants.
So, if you’re ready to learn all about render cleaning, grab a cup of coffee, sit back, and start reading this comprehensive guide. You’ll soon become an expert in render cleaning and have your walls looking like they did on the day they were first built.
- What is the best way to clean render?
- Softwashing
- Pressure Washing
- Steam Cleaning
- Chemical Cleaning
- Tips and Tricks
- Jet Washing Render
- 1. Patch up any defects
- 2. Protect surrounding areas
- 3. Use the right products
- 4. Watch out for vegetation
- 5. Start with a low-pressure setting
- 6. Use biocide for extra protection
- 7. Clean up and watch for wind
- 8. Get professional help if needed
- Watch video guides about render cleaning
- A Little more about the best way to clean render
- Choose the right products
- Use the right tools
- Follow the right techniques
- Is render cleaning a DIY job?
- 1. Assess the condition of your render
- 2. Choose the right cleaning method and products
- 3. Educate yourself and adjust your expectations
- 4. Consider safety precautions
- 5. Be prepared for unforeseen issues
- Conclusion
What is the best way to clean render?
When it comes to cleaning render, there are various methods and products that can be used. However, choosing the best way to clean render depends on factors such as the type of render, the extent of dirt or staining, and personal preference. In this article, we will guide you through different cleaning methods and products to help you choose the best approach for your render cleaning job.
Softwashing
Softwashing is a popular method for cleaning render as it involves the use of a low-pressure water-based solution that is gentle on the surface. This method is effective in removing dirt, grubby stains, moss, and mould from your rendered walls without causing damage. Softwashing is suitable for most render types and can be done by yourself or by hiring a professional.
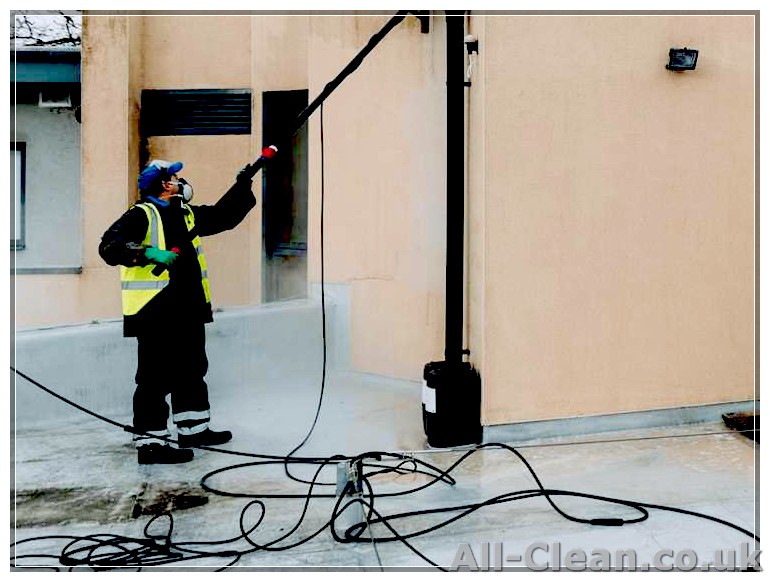
Pressure Washing
Pressure washing, also known as jet washing, involves using a high-pressure water washer to clean the render. While this method can be effective in removing stubborn dirt and stains, it can also damage the render if not used correctly. It is important to choose the right pressure and technique when pressure washing render to avoid causing any harm to the surface.
Steam Cleaning
Steam cleaning is another option for cleaning render. This method utilizes high-temperature steam to remove dirt, moss, and mold from the surface. Steam cleaning is effective and environmentally friendly as it does not require the use of chemicals. However, it is important to be cautious when using steam cleaners on certain types of render, as high temperatures can cause damage.
Chemical Cleaning
Chemical cleaning involves the use of specific cleaning products to treat and remove dirt, stains, moss, and mold from rendered surfaces. It is important to choose the right products for your type of render, as some chemicals can damage certain render finishes. Always follow the instructions provided by the manufacturer and consider hiring a professional if you are unsure.
Tips and Tricks
- Before starting the cleaning process, it is important to inspect the render for any cracks or damage. Repairing any issues beforehand will ensure that the render is protected during the cleaning process.
- When cleaning render, it is recommended to start from the bottom and work your way up to prevent streaking and ensure an even clean.
- For stubborn stains or growth, it may be necessary to use a combination of cleaning methods or products.
- Regular cleaning is key to maintaining the appearance and longevity of your render. Aim to clean your render every few months or as needed.
- Always watch the weather forecast before cleaning render. Avoid cleaning on windy days to prevent cleaning solutions from spreading and causing damage.
- If you are planning a DIY render cleaning job, make sure to educate yourself about the specific cleaning methods, products, and equipment needed.
By following these tips and choosing the appropriate cleaning method and products, you can keep your render looking clean, protected, and free from dirt, stains, moss, and mold.
Jet Washing Render
If your render is looking a little grubby or has greenery growing on it, it may be time to give it a good clean. Jet washing is one of the most effective ways to clean render, but it should be done with care to avoid damage to the surface.
1. Patch up any defects
Before you start jet washing, it’s important to fix any defects in the render. Check for cracks, loose render, or any other damage that may need repairing. This will ensure that the cleaning process is more effective and won’t cause further damage to your render.
2. Protect surrounding areas
When jet washing render, it’s important to protect any surrounding areas that may be affected by the cleaning process. Cover windows, doors, plants, and any other items that may get damaged or dirty.
3. Use the right products
There are many cleaning products available specifically for cleaning render. Some popular options include Weberend Protect and Weberpral. These products are designed to remove dirt, mould, and greenery from render without causing damage.
4. Watch out for vegetation
Rendered walls are often susceptible to the growth of vegetation, such as algae or moss. Before jet washing, it’s important to remove any visible growth using a stiff brush or scraper. This will make the cleaning process more effective and prevent new growth from appearing shortly after cleaning.
5. Start with a low-pressure setting
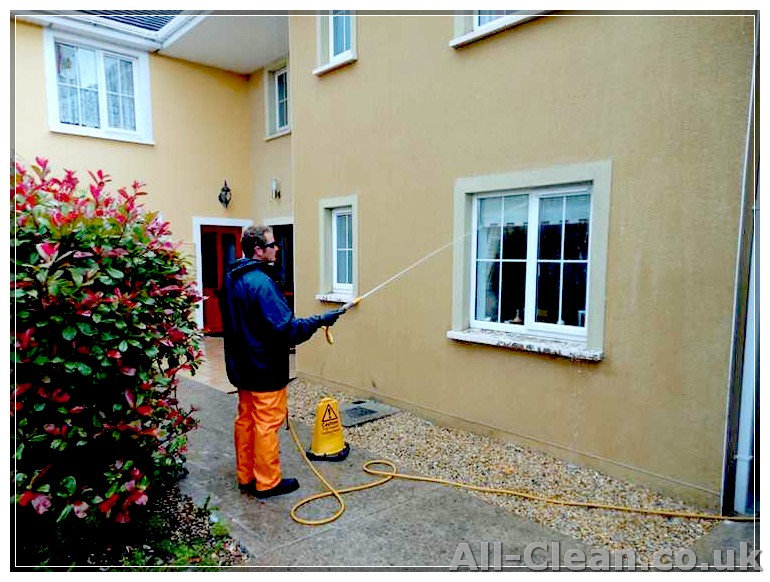
When using a jet washer to clean render, start with a low-pressure setting. This will help to avoid damaging the render or forcing water into any gaps or joints. If you find that the low-pressure setting isn’t effective enough, you can gradually increase the pressure until you achieve the desired results.
6. Use biocide for extra protection
After jet washing, it’s a good idea to use a biocide to protect your render from future growth and build-up. Biocides help to kill any remaining spores or bacteria on the surface, preventing the growth of mould or greenery. Follow the instructions on the product for the best results.
7. Clean up and watch for wind
Once you have finished jet washing, clean up any debris or water that may be left behind. Be sure to watch out for wind, as it can blow debris or water onto freshly cleaned surfaces.
8. Get professional help if needed
If you’re unsure about jet washing your render or if your render is in poor condition, it’s best to seek professional help. Professionals will have the knowledge and tools to clean your render safely and efficiently.
Remember, render cleaning is an important part of maintaining the appearance and longevity of your render. Take care of your render and it will continue to protect and enhance your property for years to come.
Watch video guides about render cleaning
- Video 1: Introduction to Render Cleaning
- Video 2: Step-by-Step Guide to Jet Washing Render
- Video 3: Tips for Cleaning Render on Large Buildings
A Little more about the best way to clean render
Cleaning render can make a huge difference in the appearance and longevity of your home. When it comes to render cleaning, there are a few things to keep in mind to ensure the best results and to protect your investment. In this section, we will go over some important tips, techniques, and products that will help make your render cleaning successful.
Choose the right products
When it comes to cleaning render, it’s important to choose the right products. There are various cleaning products available in the market, but not all of them are suitable for all types of renders. Before using any product, it’s important to read the instructions carefully and make sure it is suitable for the type of render you have.
One popular product that is often used for render cleaning is WeberPral. This product is specifically designed for cleaning and protecting renders. It is easy to apply and provides long-lasting protection against algae, mould, and other stains. WeberPral comes in different colors, so you can choose the one that matches your render color.
Use the right tools
Using the right tools is essential for effective render cleaning. One important tool you will need is a pressure washer. A pressure washer is a high-powered tool that uses water to remove dirt and grime from the surface. It is important to adjust the pressure of the washer according to the type of render you have to avoid any damage.
Another useful tool for render cleaning is a steam cleaner. A steam cleaner can be used to remove stubborn stains and patches from the render. It works by using high-temperature steam to break down dirt and grime. Steam cleaning can be particularly effective for removing mould and algae from the renders.
Follow the right techniques
To ensure effective render cleaning, it is important to follow the right techniques. Here are some useful tips:
- Start by removing any loose dirt or vegetation from the render. Use a soft brush or broom to gently sweep away any debris.
- Before washing the render, wet the surrounding vegetation and cover it with a plastic sheet or tarp to protect it from any cleaning products.
- Apply the cleaning product according to the instructions. Make sure to cover the entire surface evenly.
- Once the cleaning product is applied, leave it to work for the recommended amount of time. This will allow the product to penetrate the dirt and stains.
- After the recommended time, use the pressure washer or steam cleaner to wash off the cleaning product. Start from the top and work your way down.
- If needed, you can repeat the cleaning process to achieve the desired results.
Remember, if you are not comfortable or confident in cleaning your render yourself, it is always a good idea to hire a professional. They have the expertise and tools needed to clean your render safely and efficiently. Professional render cleaners can also teach you valuable tips and tricks to maintain a clean and well-maintained render. This way, you can enjoy the benefits of clean and grime-free walls without the hassle.
So, whether you choose to clean your render yourself or hire a professional, the key is to keep your render clean to protect it from damage and to maintain its beautiful appearance for years to come.
Is render cleaning a DIY job?
Many homeowners may wonder if render cleaning is a job they can tackle themselves. While it is possible to clean render on your own, there are certain factors to consider before deciding to take on this task.
1. Assess the condition of your render
Before deciding to clean the render yourself, take a close look at its condition. If there are mild stains, moss, or algae growth, you may be able to handle the cleaning on your own. However, if there are significant patches of graffiti or deep stains, it might be best to hire a professional.
2. Choose the right cleaning method and products
Render can be cleaned using various methods, including jet washing, softwashing, or steam cleaning. Each method has its own advantages and disadvantages, so it’s important to research and choose the one that will be most effective for your specific case. Additionally, select the appropriate cleaning products, such as biocides or specific render cleaners like WeberSIL, to ensure the best results.
3. Educate yourself and adjust your expectations
If you decide to tackle render cleaning yourself, it’s crucial to educate yourself about the process. Watch tutorial videos, read guides, and learn from the experiences of others. This will help you better understand what to expect and how to handle different situations, such as dealing with stubborn stains or adjusting your cleaning technique based on the type of render you have.
4. Consider safety precautions
Render cleaning can involve working at heights and using potentially dangerous equipment. Make sure you have the necessary tools and safety gear, such as a harness, gloves, and goggles, to protect yourself during the cleaning process. If you’re not comfortable with heights or handling power tools, it may be wise to hire a professional who has the required expertise and equipment.
5. Be prepared for unforeseen issues
While render cleaning may seem like a straightforward task, there can be unforeseen issues that arise, especially if your render is old or in poor condition. For example, you may discover cracks or loose mortar that require fixing. If you’re not confident in your ability to handle these additional tasks, it’s best to call in a professional who can address both the cleaning and repair needs.
Conclusion
Render cleaning can be a DIY job, but it’s important to carefully evaluate the condition of your render, choose the right cleaning method and products, educate yourself about the process, take safety precautions, and be prepared for any unexpected issues that may arise. If you’re unsure or not confident in your abilities, it’s always best to hire a professional who can ensure a thorough and safe cleaning.


